It’s Saturday afternoon, it’s raining outside, and I desperately need to find something to do with my kids before they drive me nuts.
I don’t feel like driving to the store, so it’s gotta include something I already have. It also has to keep their attention for more than five minutes (because I can tell you know, most kid activities I find online are either super lame, or the setup and clean up take hours while the actual activity only lasts 5 minutes).
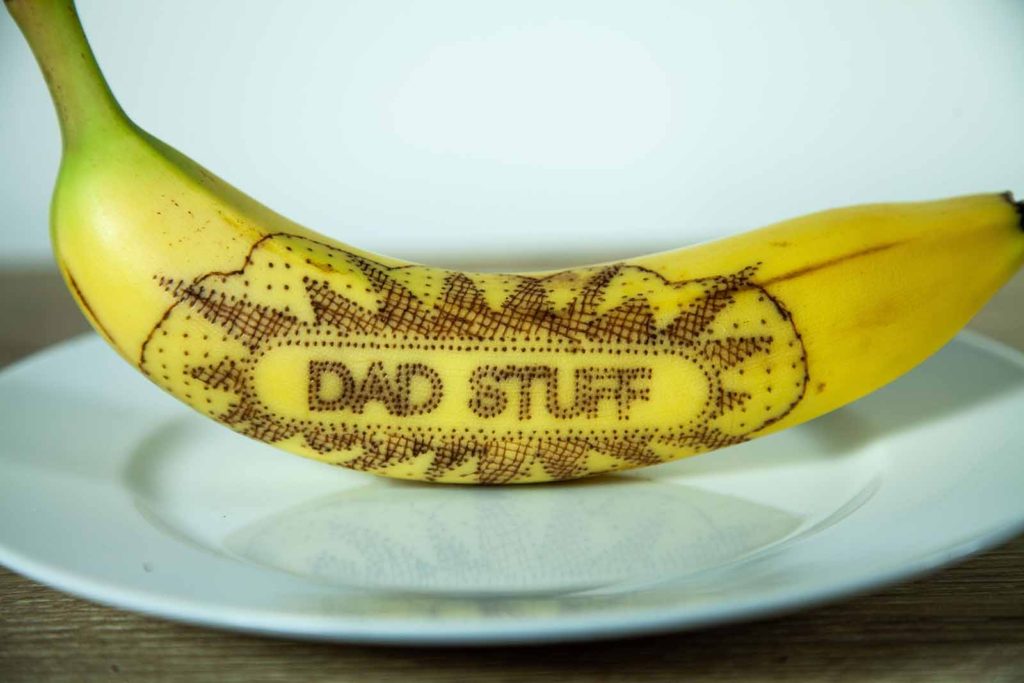
What can I do with my kids on a rainy day? Banana tattoos!
I know this sounds pretty goofy, but stay with me here on this one. We all know that bananas oxidize and turn brown over time. With the help of a small pin, you can poke a bunch of tiny holes in the surface of a banana and speed up the oxidation rate, thus drawing or “tattooing” on a banana.
Materials
- Bananas
- Pins and/or needles
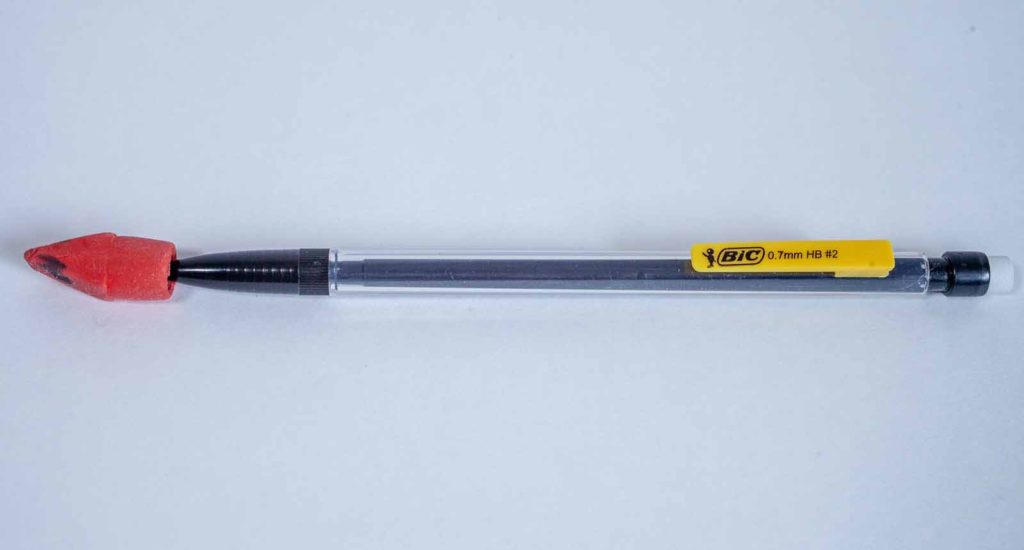
- Mechanical pencil(s)
- Eraser (optional)
- Paper (optional)
The materials for this activity are pretty simple. Obviously you need to have some bananas. I like the ones that are nice and evenly yellow (not green!) and haven’t started browning.
The next thing you need are straight pins. You can either pillage your wife’s sewing box, or do the right thing and ask her first.
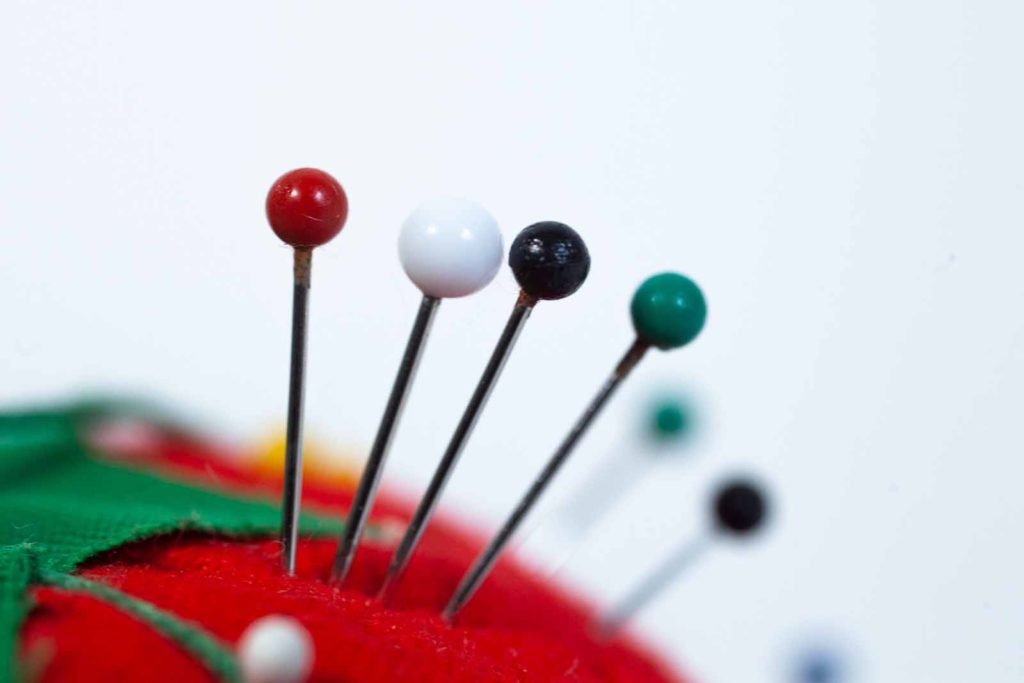

I have found that I can get better images with finer tipped pins. With bigger pins or needles, the holes you poke into the banana are going to be bigger and look more like a row of holes. Smaller pins will give you cleaner lines. It’s also a lot easier to do more intricate work with a smaller pin.
Here’s the problem with a straight pin though. It’s a lot trickier to hold, and with the number of holes you’re going to poke, your fingers are going to get tired pretty fast. But with every problem, dad always has a solution (even if your wife doesn’t want to hear it)!
Take a mechanical pencil and pop the tip off. Drop the pin into the tip of the pencil. This can get a little finicky, and you may have to get it just right.
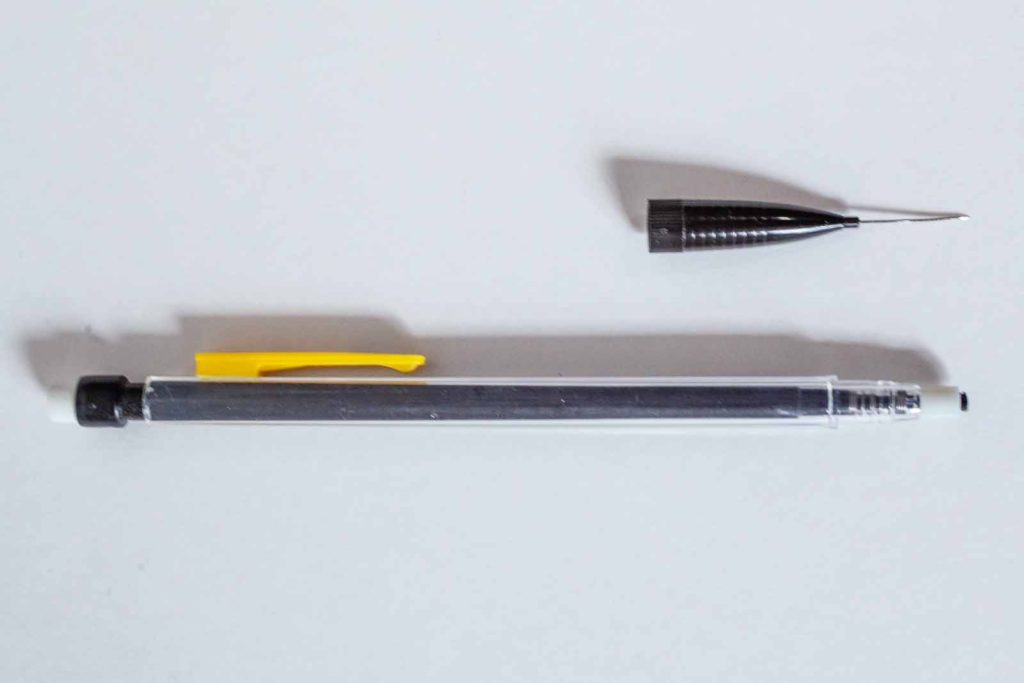
I then take a small scrap of paper and drop it in the tip.
There tends to be a little play with the pin and the paper will help keep it in place. Put the pencil back together (being careful not to poke yourself), and you now have a fancy new pin/pencil. Pincil?
Either way, it’s much easier to handle a mechanical pencil than a pin. Trust me, after a while your hand will cramp up from trying to hold onto the pin alone.
Saftey tip: Take a pencil eraser (the kind that you add to a pencil when the original pencil’s eraser is used up. Or was ripped off when your youngest gets his hands on it…) and stick it on the tip of the pin. This way you can keep your pin/pencil sheathed until you’re ready.
Printing the Stencil
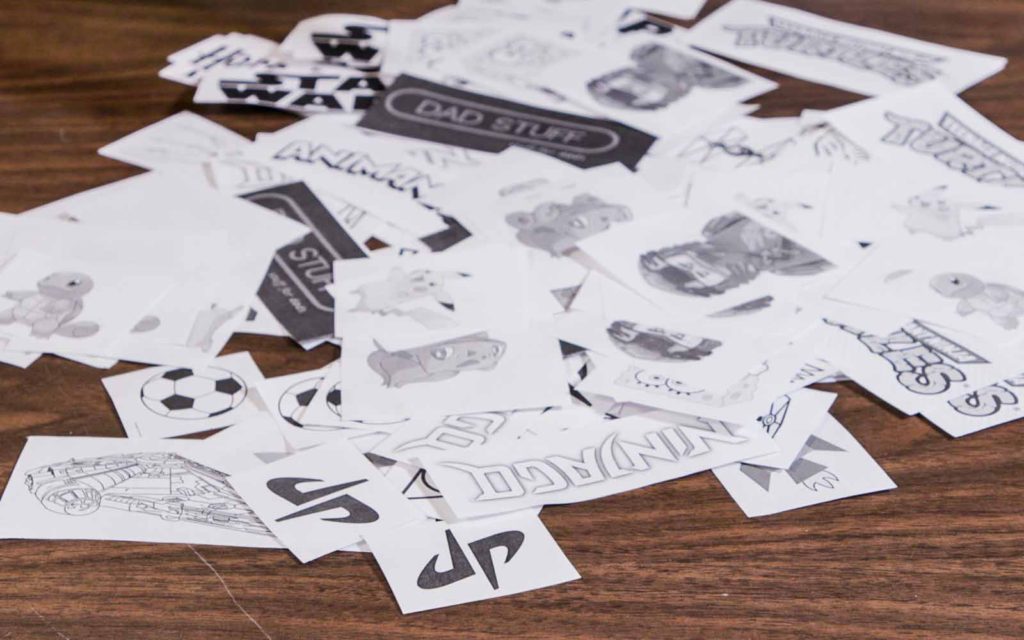
The next step is to find an image to tattoo onto your banana. This can be anything, but I have found that images that are longer and narrower work better to fit on a banana. You also want to find an image that has an easy outline to follow.
My kids are super into Pokémon right now, so I was able to find some black and white images to download from Wikipedia to print out. (Just check out a Wikipedia entry on your kid’s favorite character, click the image on the right, and there should be a download option.)
You might need to fiddle around with resizing the image in your printer setting to get it just right for your bananas, but all you need to do is print out your images onto regular paper, cut out your stencil/image, and tape it to your banana.
Tattooing Your Banana
Outlining the Stencil
The next step is to start tattooing your banana! It’s quite a simple process. You’re going to want to poke tiny holes really close together along the outline of your stencil.
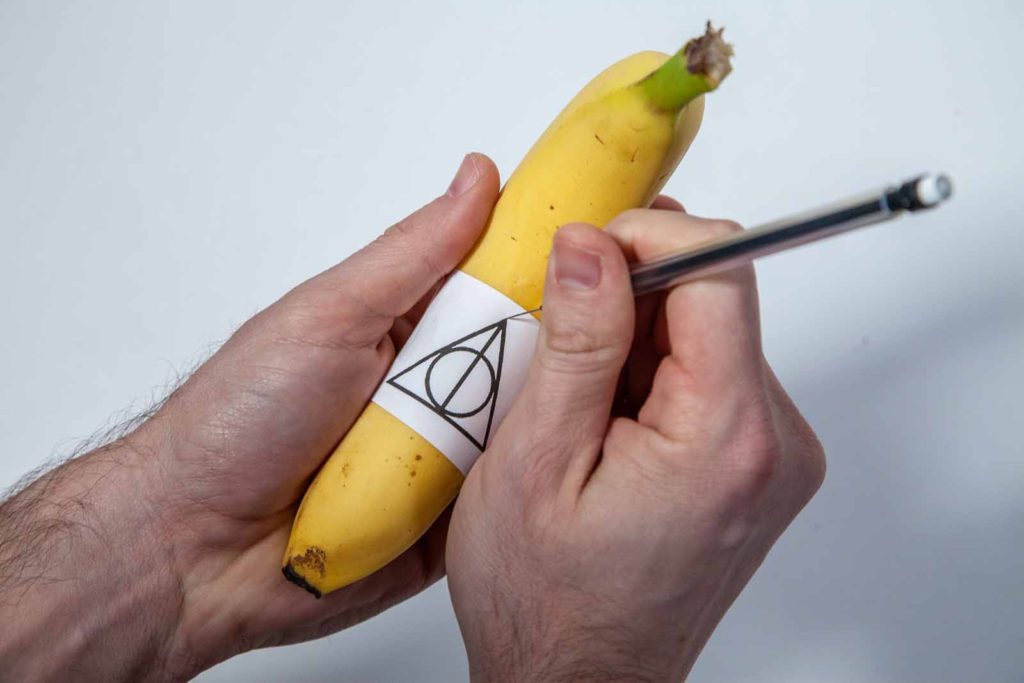
You’re going to poke holes through the paper and just into the outside of the banana. You don’t need to go very deep, just enough to break the surface. Try your best to keep the holes close together to give a nice clean line.
Another tip is to start from the inside of the stencil and work your way out. Between poking holes through your stencil and breaking the surface of your banana and releasing a small amount of moisture, the poked through parts of the stencil will gradually fall apart. You want to get all the details on the inside of the stencil before the whole thing comes apart.
If you’re looking for something of a short cut (especially if you have a longer line or something not too complex), you can space out your dots a little farther, and once you’ve outlined the whole image, pull the stencil off and drag your pin between holes to connect the dots.
Different Ways to Shade
This is next-level stuff. If you only go as far as the previous section, you’ll have a great time and make some cool art.
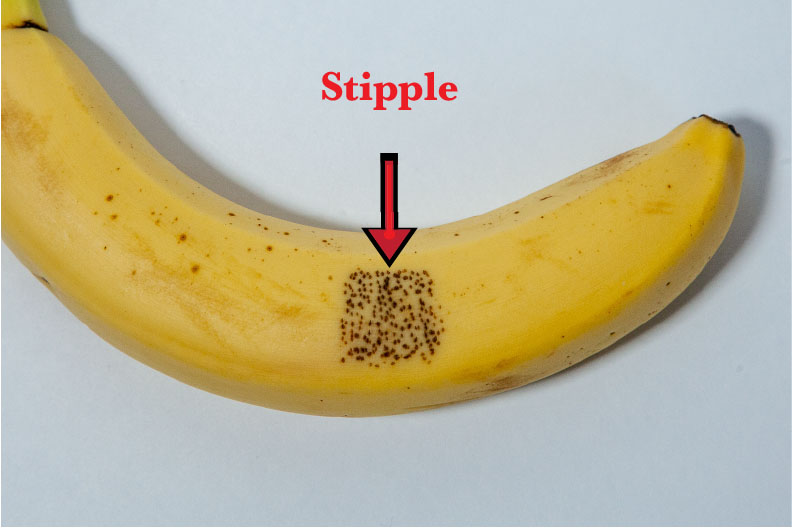
There are a couple of ways to fill in the dark areas. The first is by stippling, or poking repeated shallow holes. You can make the area look lighter by having less holes in an area or darker by going to town and adding a lot of holes.
Another way to shade is to use something with a blunt tip, like a mechanical pencil without any lead or the back side of a sharpie. Holding your pencil on an angle, gently rub the banana without breaking the skin. This will cause the peel to bruise and give a lighter shade of brown.
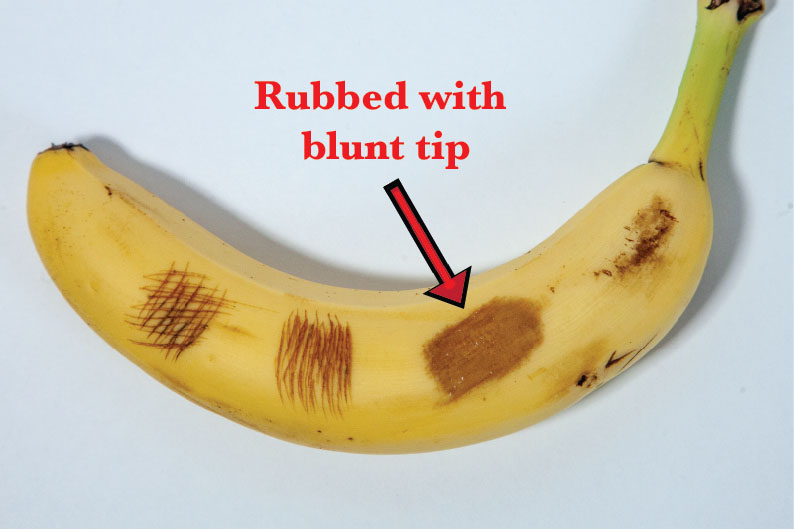
This method often takes a little longer to turn brown and tends to be a lighter shade of brown.
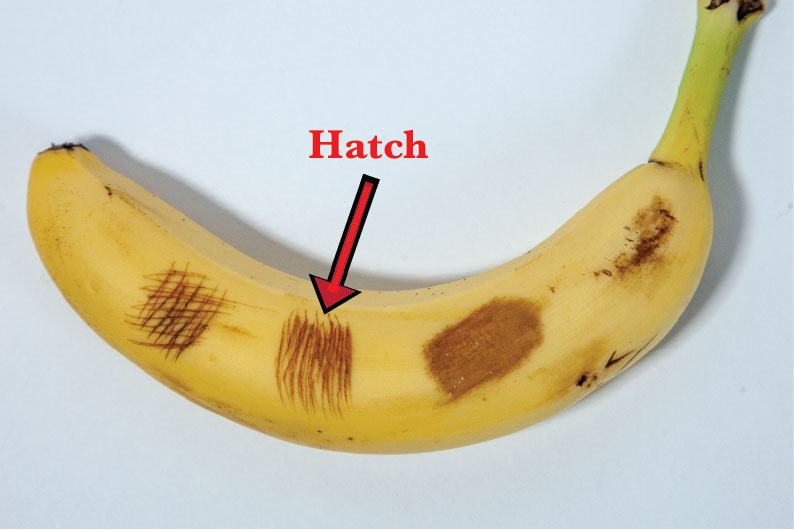
You can also use some basic sketching techniques like hatching, where you lightly scratch a bunch of lines in one direction.
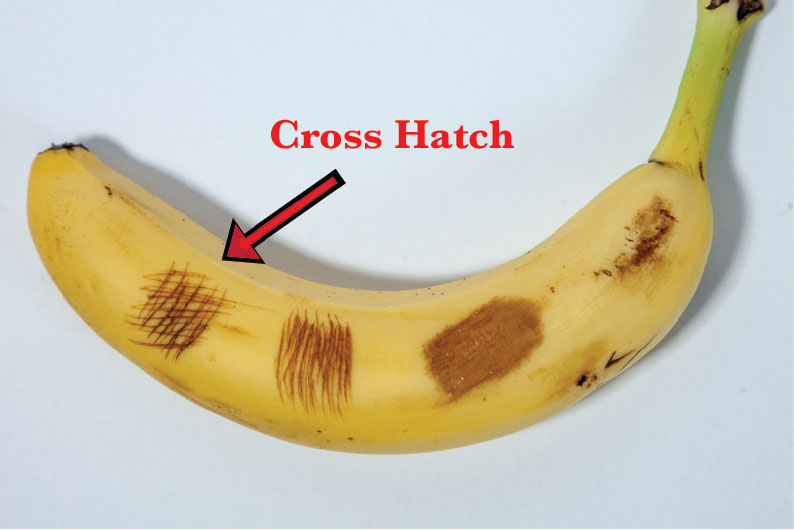
And if you scratch those lines but perpendicularly, you have a cross hatch.
How long will my banana tattoo last?
Depending on how much shading and bruising, and how old the banana is, it should generally last a day. Some finer details that were made by breaking the skin will be lost sooner, but the whole image will last longer. I have found that shading that was done by bruising the peel lasted the longest.
Ultimately, this is a temporary art, so take lots of pictures.
Dad Pro Tips
If you want to win some major dad points, tattoo a banana before school starts and leave it in your kid’s lunch bag for them to discover during lunch.
If you want to take your dadding to the next level, include a dad joke (“I find you apeeling”) or something that will fully embarrass your child (like a pet name from when they were a baby).
But the ultimate dad hack comes when you ask yourself: what do I do with all these bananas? (Especially when you decide to be the hero over Thanksgiving and have the whole extended family try this activity.) The answer: banana pudding. And I have the ultimate recipe right here.
Recent Posts
I can’t help but want to share the favorite parts of my childhood with my kids. I’m quite proud of the fact that my youngest’s favorite books are Garfield and Calvin and Hobbes. Pretty soon it...
So you checked out my article to banana tattoos and now you’re wondering what to do with all of these bananas. I’ve got a great solution: banana pudding. I know what you’re thinking,...