

We may receive commissions from purchases made through links in this post, at no additional cost to you.
Flying rockets is super fun. My kids and I have a blast launching them into the sky and chasing them down. We love the idea of putting in a stronger engine each time and seeing how high we can go.
But when my kids ask, “How high did our rocket fly?” my answer has been: I have no idea. I can estimate how high it was projected to go from the box the rocket came in, but it’s really guesswork. Enter the next deep dive.
You can find out a rocket’s altitude manually or digitally. To find out a rocket’s height manually, measure the angle of the flight using a single or dual-axis tracker and plug the measurements into an equation or reference an altitude chart. To measure digitally, use an altimeter inside the rocket.
Let’s take a look at each of the options to measure both manually and digitally and figure out which method is best for you.
You may also be interested in How High Can a Model Rocket Fly (Plus 3 High Flying Rockets).
Single-Axis Tracker
If you ever launched rockets in school, you’ve probably used a single-axis tracker (you might have had one of those sneaky teachers that used rockets as a way to get you interested in a subject…only to have you then do the math. Can you believe that?). If not, a single-axis tracker is a handheld almost gun-like tool that is used to measure the angle of your flight from a fixed position.
This article is originally from www.dadstuffsite.com
You start by standing a measured distance away from the launchpad. When the rocket launches, you aim the tracker at the rocket while holding down the trigger. When the rocket reaches apogee (the highest part of the flight before it starts coming back down to Earth), you release the trigger. The dial on the tracker then points to the angle of your flight from your position.
If you don’t feel like buying one of these trackers (they’re about $20), you can make your own pretty easily. NASA has a simple tracker you can print and cut out.
You can also get the template from Mark Westerfield’s book, Make: Rockets. Cut out the template from a piece of Dollar Tree foamboard and glue or tape on the protractor. Then thread a piece of string through a hole marked on the protractor. Tie a weight to the end of the string (make sure it hangs past the protractor. The string itself will show you the measurement.). There’s no fancy trigger, so you need to hold the weight in place when you want to measure the angle at apogee.
Related: Altitude Table for a Single-Axis Tracker
How to Measure Your Altitude Using a Single-Axis Tracker:
You then take the distance you stood from the launch pad and the measurement from the tracker and either plug it into an equation (I’ll show you this in a bit), look up the number on a chart, or input the measurements into an online calculator. Then Bob’s your uncle, you get your altitude.
Sort of. Let’s look at what’s going on for a minute. Here’s your trigger warning, we’re going to talk a bit of math. Actually, it’s trigonometry. I know that might bring back some PTSD for some of you, but don’t sweat it, you don’t have to do any actual math to understand what’s going on.
The math behind a single-axis tracker is based on figuring out the length of one side of a right (90-degree) triangle. You already know the measurement of one side (the distance between you and the launchpad). The single-axis tracker (sometimes called a single station tracker) is really a glorified protractor (you know, those half-circle tools you used in middle school that measure angles?) and is used to give the measurement of one of the angles of the triangle.
This article is originally from www.dadstuffsite.com
If you know how far you are from the launch pad (say, 100 feet) and you know the angle of apogee (the highest point of flight before your rocket comes back to earth), then you just need to plug it into the following equation and it will give you the length of the other side. (Don’t be freaked out by the word tan. There’s a button on your phone calculator that does the math for you).
A = B tan q
A = unknown height; the number you’re trying to figure out
B = length from launchpad to you
q = angle
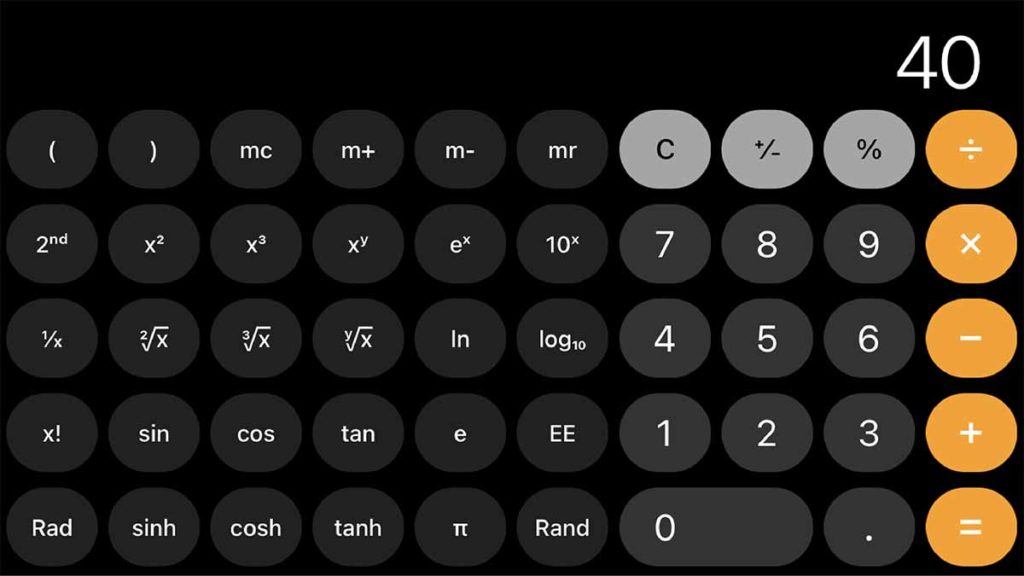
If our distance to the launchpad is 100 feet, and the angle was 40 degrees, then plug it into your phone’s scientific calculator (for all you iPhone people, if you open the calculator app that comes with your phone and turn your phone sideways to the landscape orientation, it’ll turn into a scientific calculator).
- Type “100”

- Press the “x” or “times” button
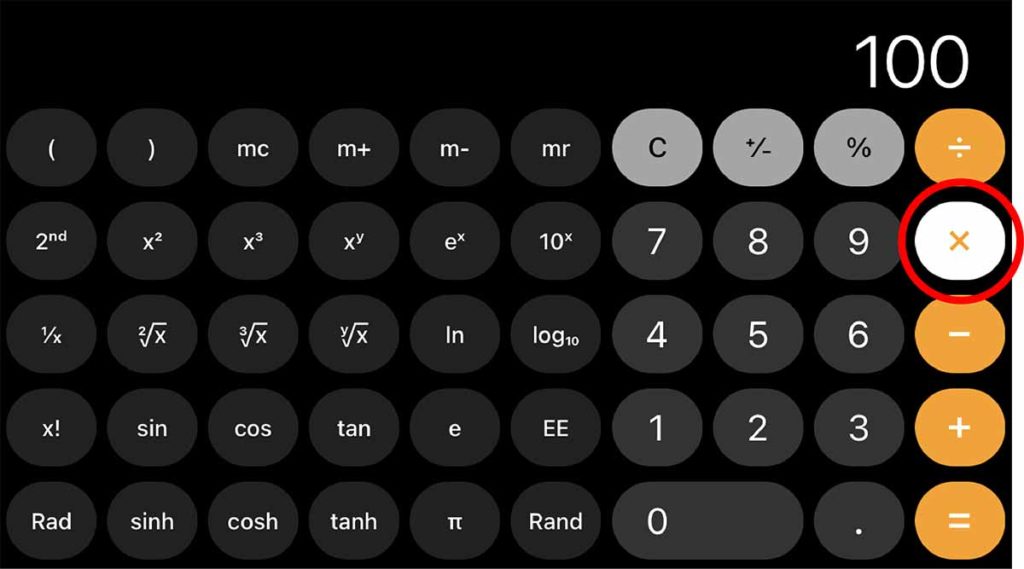
- Type “40”
- Press the “tan” button

- Press the “=” or “equals” button
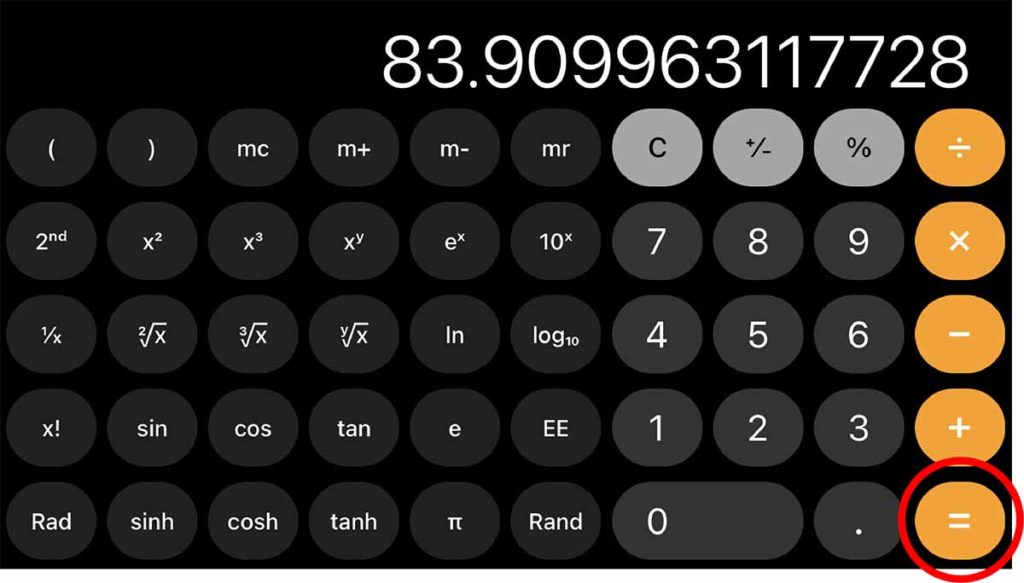
The answer should show up as 83.9099…. Let’s just round that to 84. You’re rocket went 84 feet, with an accuracy of about plus/minus 14 feet. (Wait, what?!?)
If you’re interested in high-flying rockets, check out Make My Rocket Fly Higher (Engine Selection and Finishing).
The Problem with a Single-Axis Tracker
So, a single-axis tracker is not super accurate. It’s good enough for most of us and can get us in the ballpark, but there are a number of issues here.
For starters, it’s based on the assumption that your rocket was pointed at a perfect 90-degree angle and went straight up the whole time. It also assumes you’re perfectly level with the rocket when you took off. And that your baseline measurement is perfect. And that you eyeballed the angle perfectly (are you starting to see the issues?).
The truth is, there is a big difference between the practical and the theoretical, and any deviation from the ideal will mess with your numbers. Hence the plus/minus 14 feet. There is a way of getting around some of the potential imperfections, but that gets into what engineers call standard deviations and that gets into calculus, and that just makes my brain hurt.
You can get your measurements and plug them into a chart like this one, which will get you in the ballpark. If you want to nerd out on some calculus, check out Norman Dziedzic Jr.’s article in his Peak of Flight Newsletter No. 92.
This article is originally from www.dadstuffsite.com
Dual-Axis Tracking (Theodolite):
The more accurate method of measuring how high your flight goes is to use a Dual-Axis Tracker (also known as a theodolite or two-station tracking). This involves using two tracking stations that measure not only the angle vertically, but horizontally. The altitude is measured more accurately because the rocket is measured from two perspectives, allowing for any deviations from a perfectly straight flight.
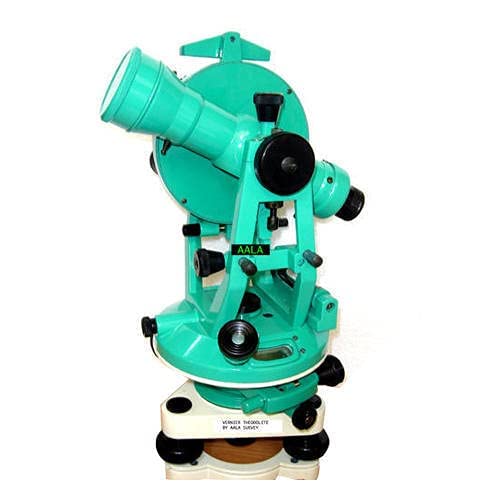
You can think of the difference between the single-axis and dual-axis tracking as: single axis is measured two-dimensionally, while the dual axis is measured three-dimensionally. This method is also used in NAR (National Association of Rocketry) competitions when accuracy is essential.
It’s also super unrealistic for dads to do with their kids. You need at least three people to do this and it requires a lot more math. Not to mention theodolites are hard to come by, so you’re probably going to have to make your own. I’m all about DIY, but this is beyond even me.
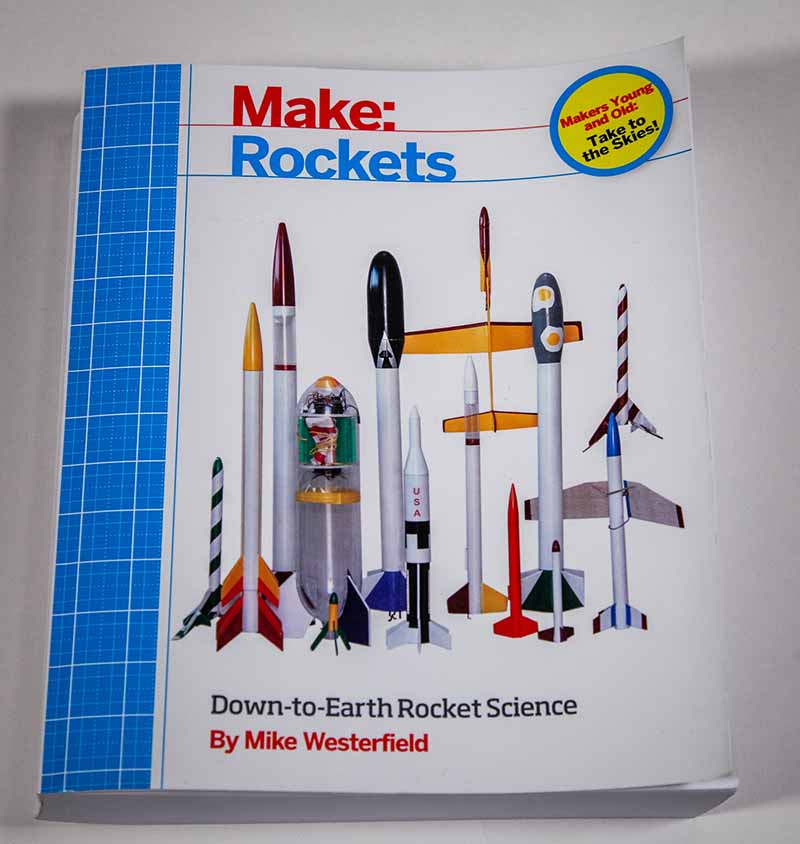
If you’re tougher than me and want to super nerd out on this, check out Norman Dziedzic Jr.’s article in his Peak of Flight Newsletter No. 93. There’s also a great chapter (chapter 8) in Make: Rockets by Mike Westerfield. He includes plans and templates to build your own theodolite. (FYI, the website he includes in the book for his templates has changed. You can find the templates here.)
New to rockets? Check out Model Rockets with Kids (What to Get and Where to Launch).
Altimeter
It is in fact the 21st century, so you know there have to be some digital options. And for all you people who hate math, be glad to know there is something called an altimeter. An altimeter, or altitude meter, is a small micro-computer that measures the altitude of an object above a given level.
There are a couple of different altimeters out there for rocketry, but a lot of them deal with parachute releases and are for high-powered rocketry. I’m going to focus on the ones we can use for our little park launching rockets.
Different altimeters use different measuring tools, the most common measuring changes in barometric pressure. This means that you may need to poke a small vent hole in your rocket to get proper barometric readings.
But since technology is changing so fast, we’re starting to see more altimeters come out with more bells and whistles. Some come with accelerometers that take a whole bunch of different measurements of your flight. Even cooler, is that some are now set up with Bluetooth so you can control it on your phone or tablet with an app that’s integrated with social media.
Need help picking out your next rocket? Check out Best Beginner Model Rockets to Build and Launch with Your Kids
This article is originally from www.dadstuffsite.com
Three Altimeters Worth Checking Out
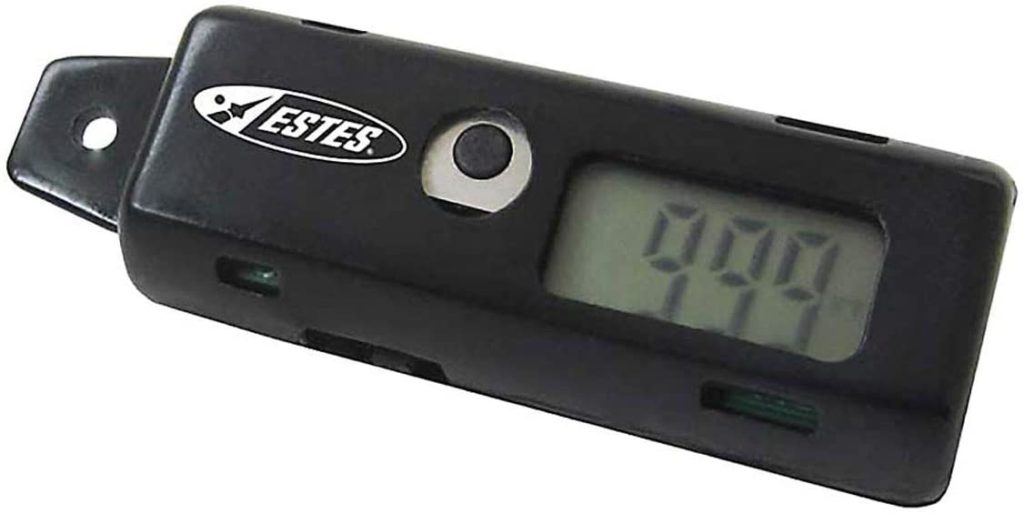
Estes Altimeter
The first altimeter worth checking out is made by Estes. This is going to be your best budget option and is pretty straight forward. You clip it to your nose cone and it will tell you your altitude on a little LED screen. Available on Amazon and or your local hobby/craft store (I’ve been able to find a lot of Estes rocket products at my local Hobby Lobby, often cheaper than Amazon.).
MicroPeak Altimeter
Another altimeter worth checking out is made by MicroPeak and this guy is tiny! This altimeter was designed to be used to compete in international rocketry competitions. With the battery it weighs only 2 grams (less than a quarter of the weight of the Estes ltimeter). This is a great option to use with your small rockets. You simply put it inside the nose cone (it’s that small) with a little wadding to cushion it.
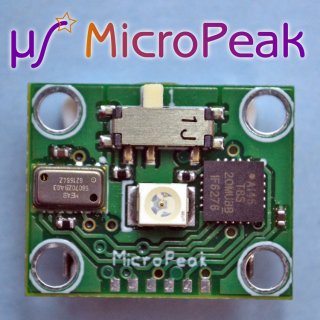
The price is pretty great (at around $30, comparable to the Estes), you can fit it in smaller rockets, and is pretty tough. The major down side to the MicroPeak altimeter is that it does not have a display. After recording your flight, it will blink back the maximum height in on a single blinking LED. You can download the flight data by connecting the adapter cable to the usb port of your computer.
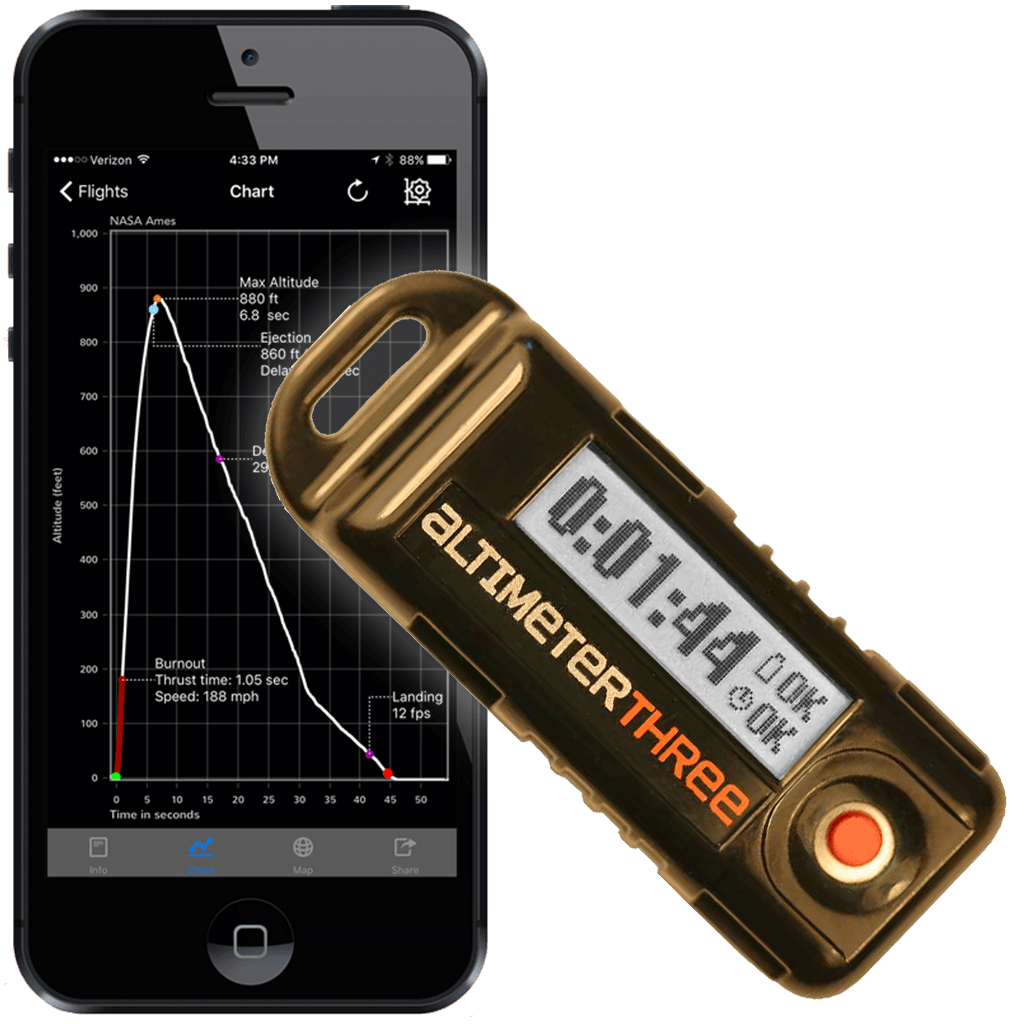
Jolly Logic Altimeters
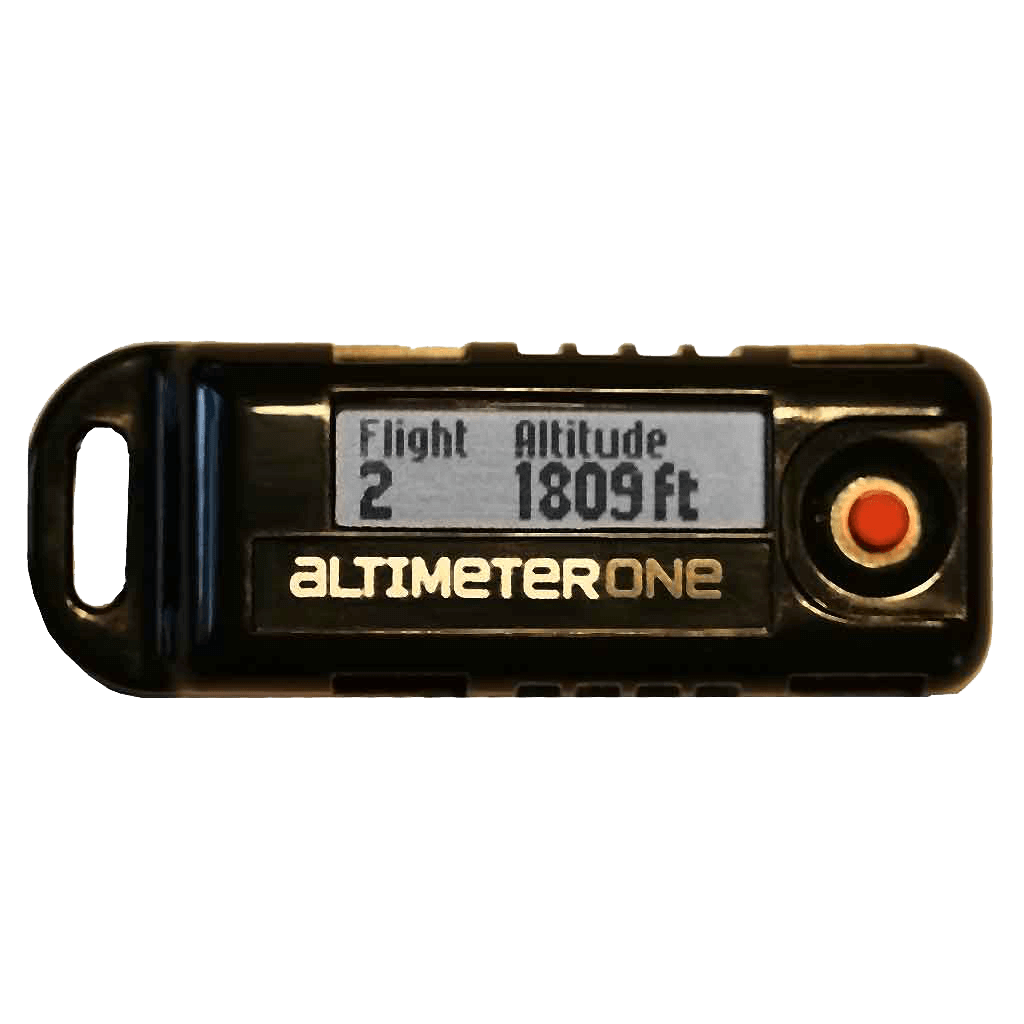
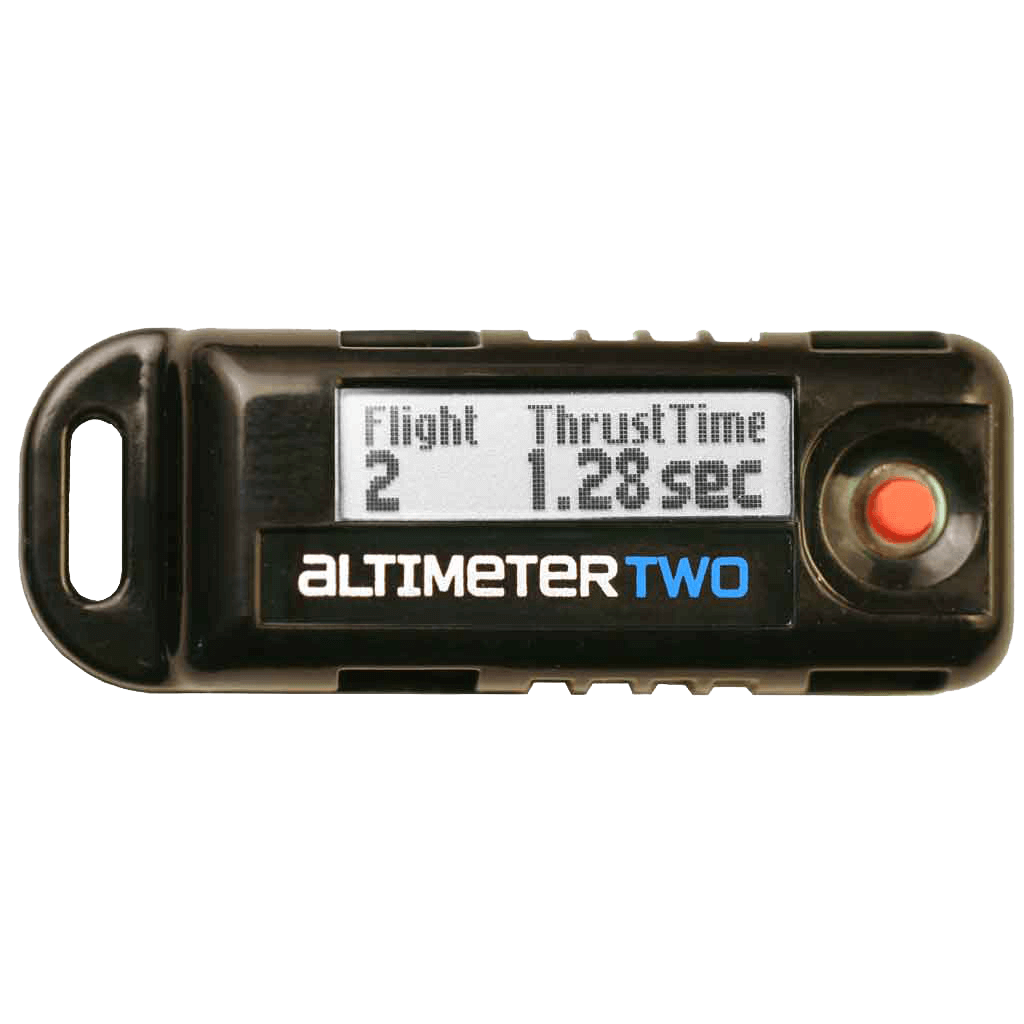
If you’re looking to get a little extra, check out the line of Jolly Logic Altimeters. There are three to check out (AltimeterOne, AltimeterTwo, and AltimeterThree. I could make a snarky comment about the names, but I also really like that they kept it that simple) and each number gives you more bells and whistles.
All three have a similar design, and like the Estes altimeter, connects to the nose cone of the rocket and has an easy-to-read LED display. The barometer is super accurate and can detect changes of less than one foot. All come with rechargeable Lipo batteries.
AltimeterOne measures height, while AltimeterTwo gives a lot more flight data including max altitude, top speed, engine thrust duration, peak acceleration, ejection timing, and total flight time. It’s also approved by the National Association of Rocketry for competition use.
AltimeterThree takes things to the next level and gives you smart phone/tablet integrations. This one sends the flight data to your smart device over Bluetooth and can share your data over social media. The app shows you an interactive graph which is downloadable to an excel sheet. It’s also the most expensive at around $100.
Related: How Big (and Small) Can You Make A Model Rocket?
Which Altimeter is Best for Low Power Rocketry?
The inevitable next question is, which method is best? The ultimate answer is, it depends. It depends on how much you want to spend, how much you want to do the measuring yourself, and how many people are involved.
If you’re looking to make this an educational moment with your kids, then consider the single axis tracker. This is especially helpful when you have a couple kids as it’ll give someone a job while kid is launching their rocket.
If you have a rocketry club and you’re getting super serious about rocketry, then you might consider building a theolodite.
If you’re looking to just have fun and want to see how high you go, then go with the altimeter. All of the altimeter options are great but it comes down to how much information you want to find out. If you’re going to fly a couple times, go with the Estes Altimeter. It’s the simplest, no frills, cheap option.
If you have some money to burn, then go with the Jolly Logic, especially if you see yourself getting into the hobby. The smartphone integration gives you so much more information and makes everything simpler.
But unless you’re getting really good at launching straight and tracking down your rockets, remember that there is a very good chance (especially once you start putting on class C engines) that you might lose your rocket, and there for your altimeter.
This article is originally from www.dadstuffsite.com
The Dad Stuff Recommendation
With all the considerations above, I personally would go with the Estes when you’re just starting off. It’s not super expensive, easy to use, and readily available. If I lost a rocket, I wouldn’t be too upset about losing this altimeter (I would be super annoyed about losing the Jolly Logic AltimeterThree) and I can easily pick up another one at Hobby Lobby right now.
Diving Deeper into Model Rocketry
If you find yourself getting seriously into rocketry and you want to learn more, check out Make: Rockets by Mike Westerfield. Make is an awesome resource for so many things STEM-related and this book will give you everything you need to know about low-powered rocketry including compressed air and water rockets.
This book is no-joke and is about 1½ inches thick. This book has become my rocket bible and is a great resource (and no, Make did not ask me to say any of this).
Related Posts
Last week my son asked me how high a rocket can fly. As I went on my deep dive and explored just how high low-powered rockets can go, I started to ask myself another question. How can I make my own...
How High Can a Model Rocket Fly (Plus 3 High Flying Rockets)
I’m sitting at the kitchen table building rockets with my two little boys, and my oldest asks how high his rocket is going to go (and more importantly, will it go higher than his little...