
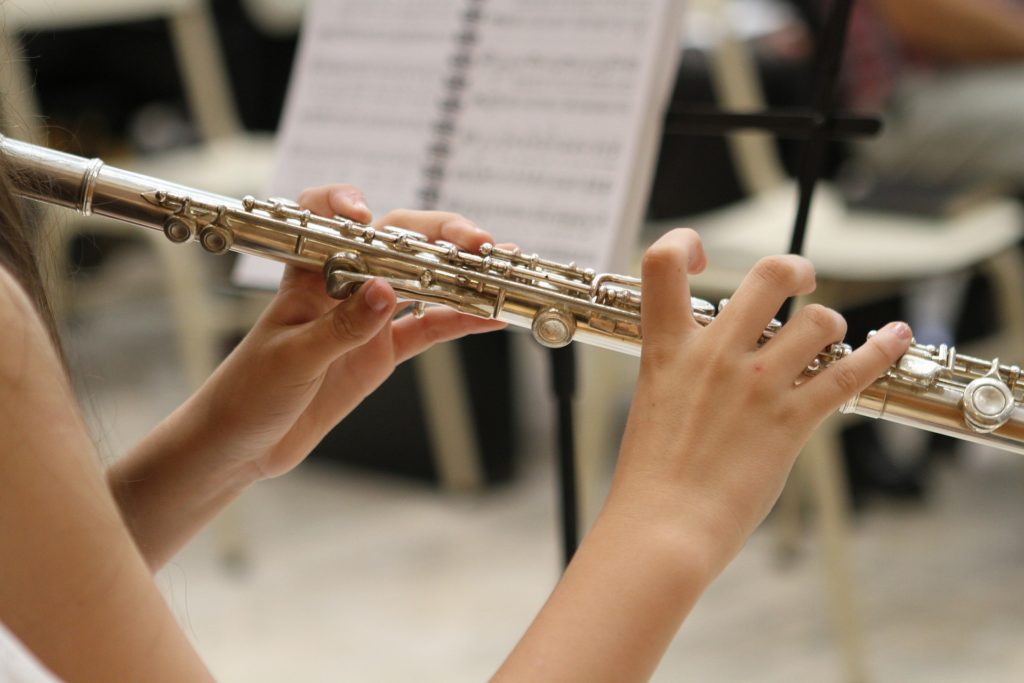
A couple weeks ago your child decided they want to join band. You filled out the paperwork, signed up for the class, and their flute has finally come in. Your kid is super excited to start, but you’re starting to feel the pangs of anxiety.
You want your child to succeed and have fun, and you’ll do anything you can to help. Except you know nothing about the flute. Chances are you know little about band and are worried you’re going to do more harm than good.
Fear not, this guide is here for you! As a college music professor, a former band director, and a dad of two boys myself, I can give you all the flute basics you need to know as a parent.
I’m going to explain basic flute terminology, playing fundamentals, and things to pay attention to so you can help your child do their best. By the end of this article, you’ll have some lingo to use when talking to your kid and their teacher about the flute.
If you’re still deciding whether to buy or rent a flute, check out Renting vs Buying a Beginner Instrument. It will give you everything you need to know to help you make the right decision.
First Days with the Instrument
The first days are going to be a test of patience your child. They will want to open that sucker up and jump right in. Don’t let them! In fact, don’t let them touch it yet (you can open it and look at it longingly, but no touching).
Until your child gets instruction from the band director or private lesson teacher, they’re not ready to put it together. In fact, they’re more likely to do accidental damage. There are a lot of small moving parts, and grabbing it the wrong way can move a pad out of alignment. The last thing you want to do is have to make a repair before you’ve even started.
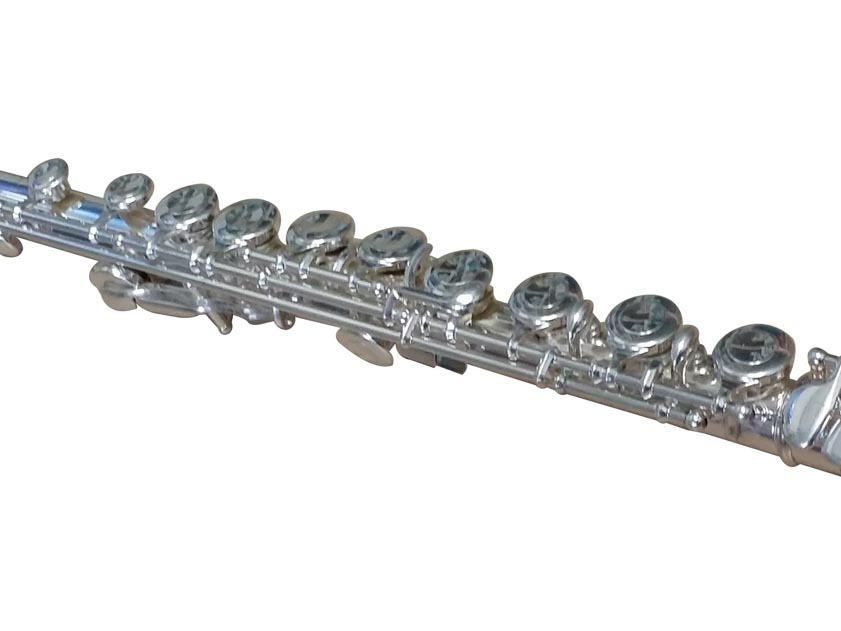
Parts of the Flute
Let’s start by explaining the different parts of the flute. This way you know what should be included in the case, what the pieces are called, and what they’re for.
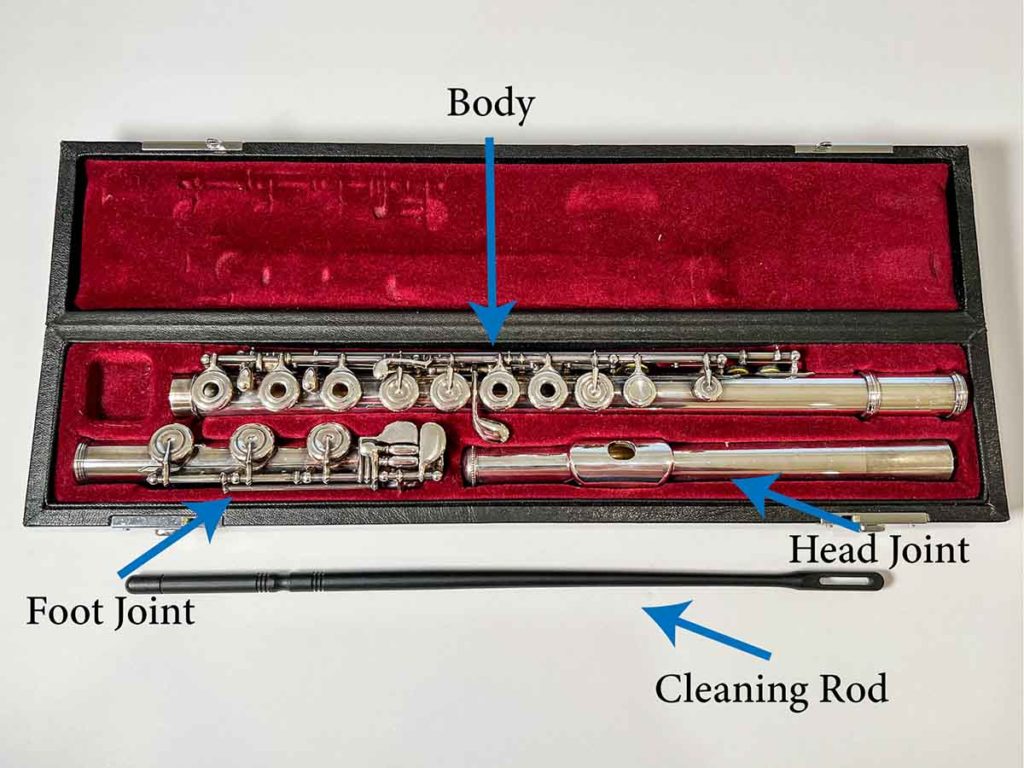
The first part we’re going to look at is called the head joint. This is the part your child is going to blow across (not into. You create sound on a flute by blowing across the top, kind of like what you do on a beer bottle).
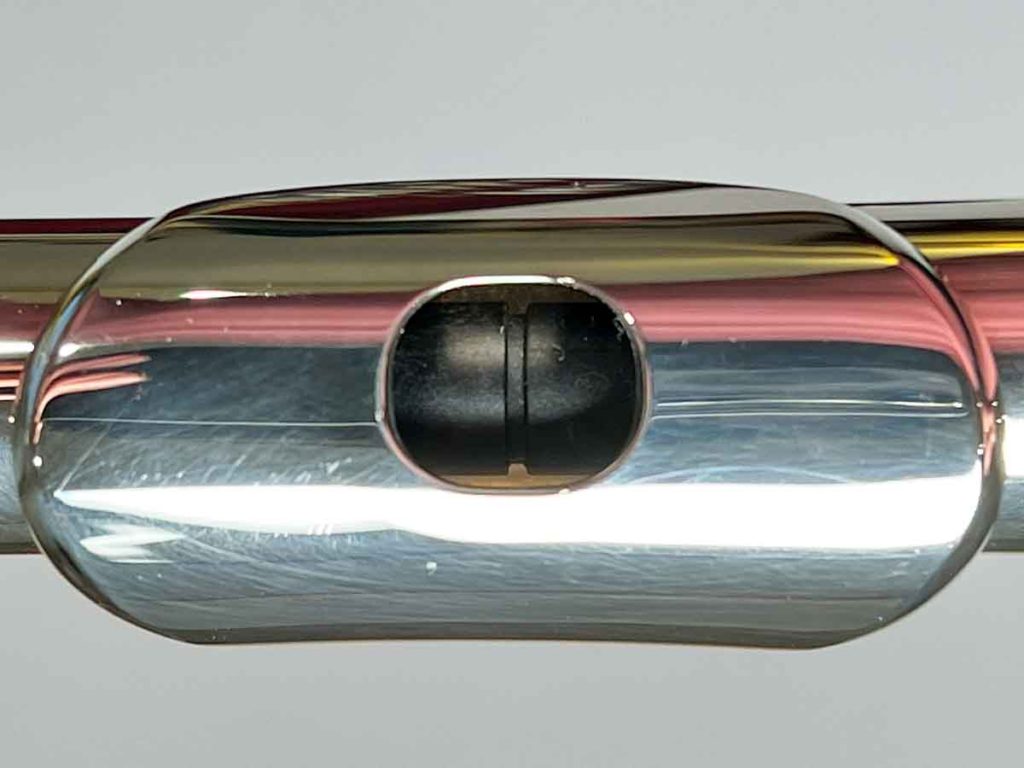
There are three parts to the head joint: the lip plate, the embouchure hole (pronounced AHM-bo-shure. Sometimes called a tone hole.), and the crown.
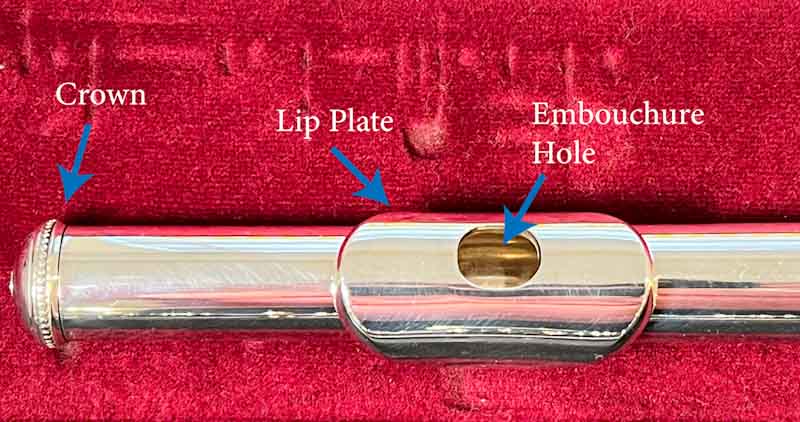
The main thing to know here is to not mess with crown. The crown screws to a cork inside the end of the head joint. It’s positioned in a specific spot that will help tuning later. This should already be set correctly, so don’t mess with it. In fact, as long as it’s set correctly (17.3 mm from the middle of the embouchure hole to be precise), you will likely never have to mess with it.
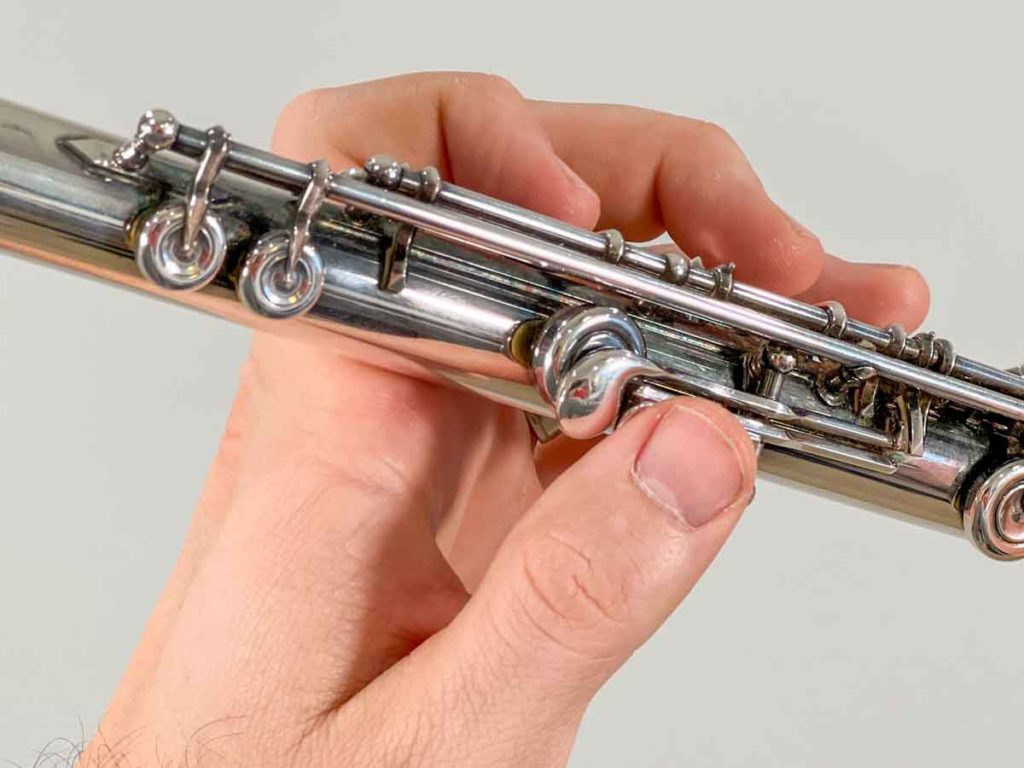
The next part of the flute is called the body. This is the longest part with all the keys. One side will have no keys and has the brand name engraved on it. This end connects with the head joint. The other end connects to the foot joint.

This leads to the last part of the flute, the foot joint. The end with all the buttons connects to the body of the flute.
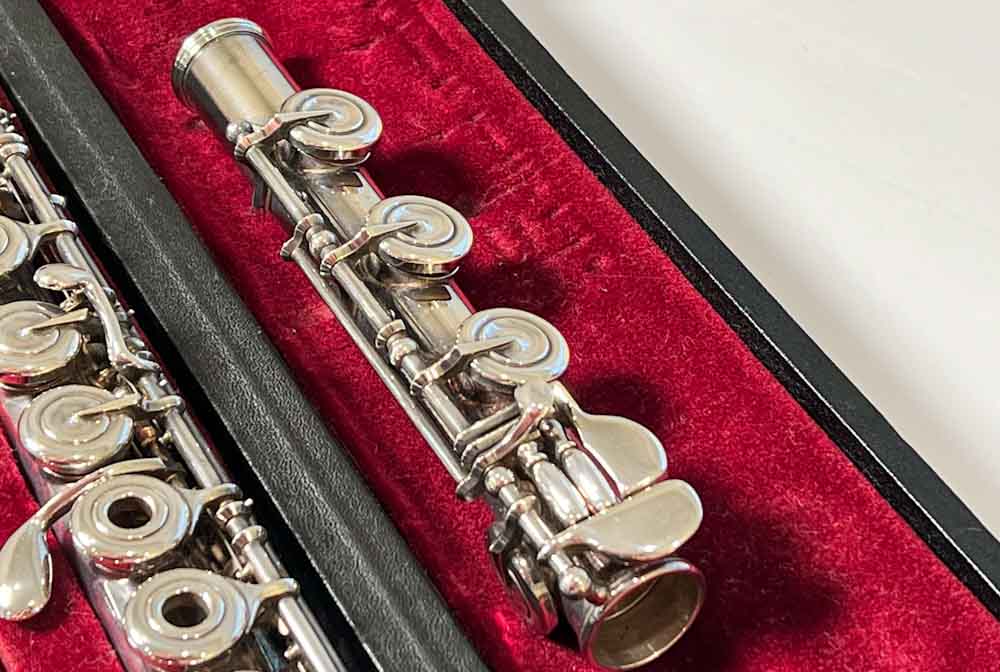
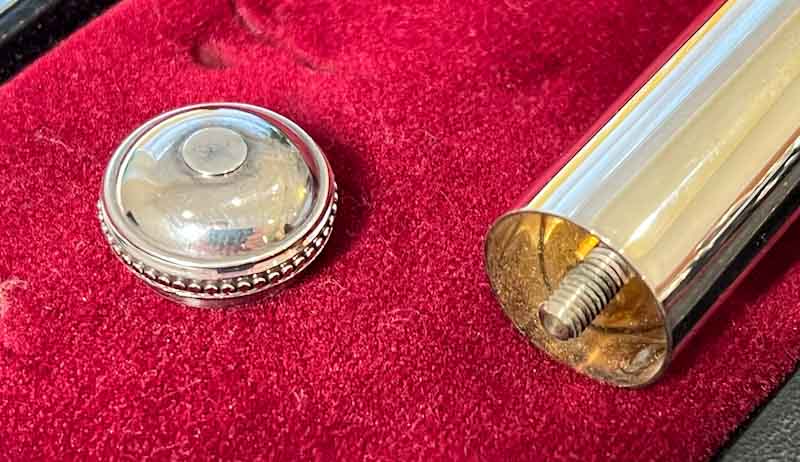
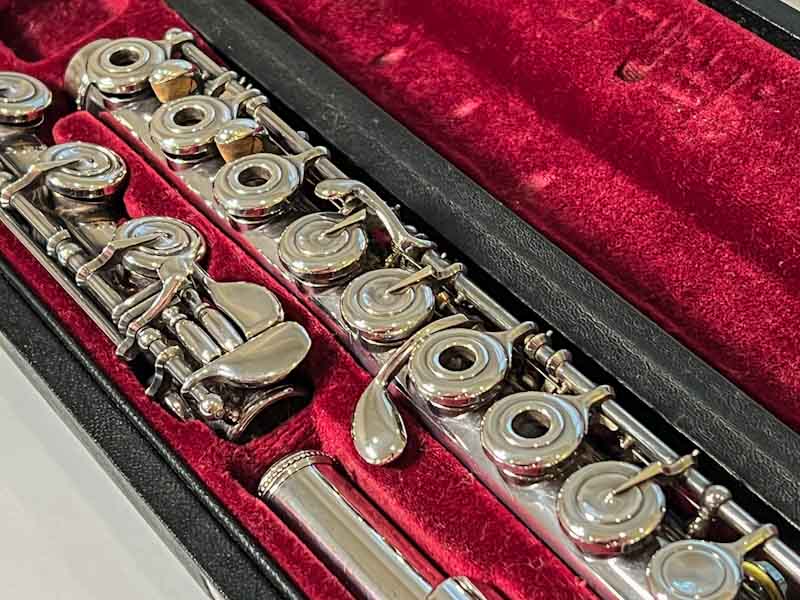
Some other accessories that come with the flute include a case and a cleaning rod. One side of the rod will have a long hole, and the other side should have a couple tick marks.

The purpose of those markings is to check the placement of the cork connected to the crown. Simply insert the rod (the part opposite the long hole) into the head joint until it touches the cork. If you look into the embouchure hole, you should see a line from on the cleaning rod exactly in the middle of the embouchure hole.
If the line is off center for some reason, don’t try to fix it yourself. Let your flute teacher or band director know. It’s a simple enough adjustment that doesn’t need any extra tools, but leave it to someone who knows what they’re doing to make the adjustment.
Frustrated trying to get your kids to practice? Check out Getting Your Child to Practice Music: 20 Tips for Motivation
How to Put Together and Take Apart a Flute
While you’re not likely to ever play your child’s flute (unless you’re just super curious), there is a good chance you might need to help put it together or take it apart, especially in the beginning. Here are the steps:
- Open the case correctly. Make sure the case is right-side-up: the latches should open upward (if it has latches), or the instrument brand should be oriented the right way.
- Put together is the head joint and the body. Hold each piece in the palm of your hand with your fingers wrapped around it. Be sure to hold the body at the top part where there are no keys (usually where the brand is engraved). You want to have a good grip, but don’t hold the flute too tightly.
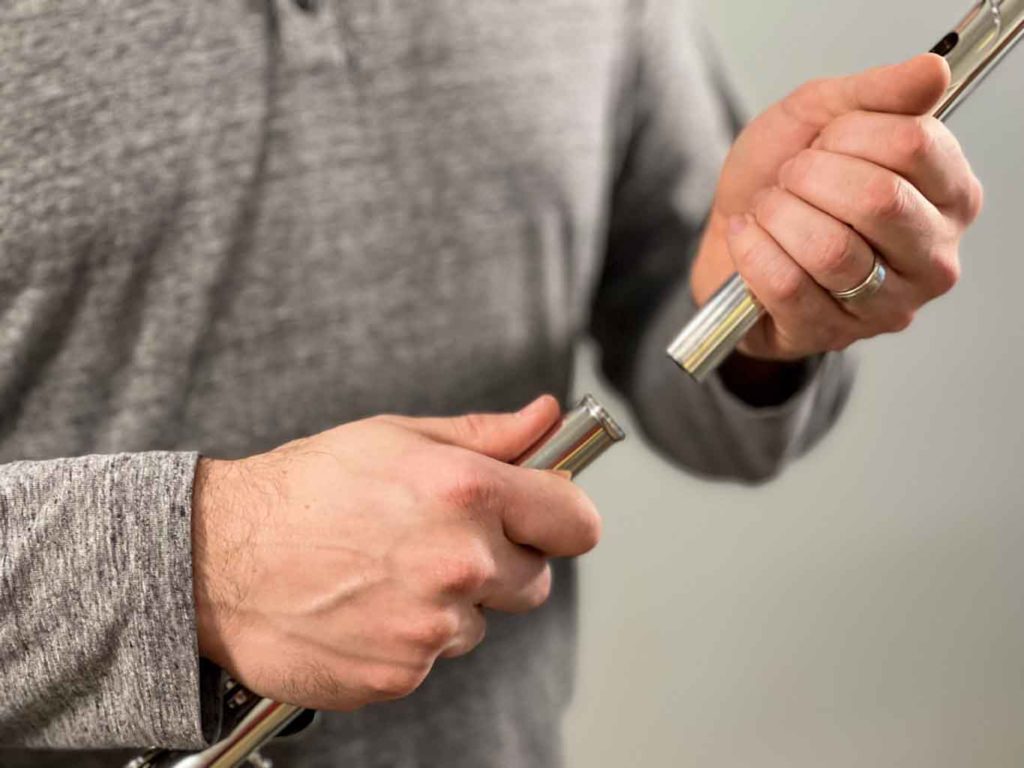
- Use a gentle twisting motion as gently press the pieces together.
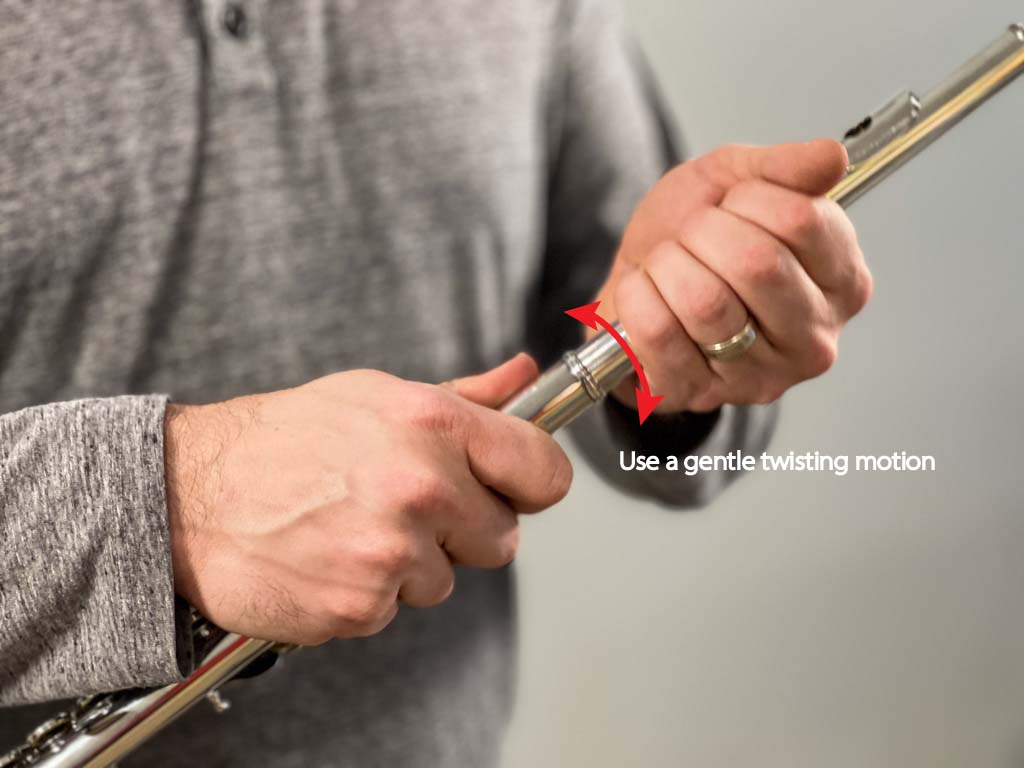
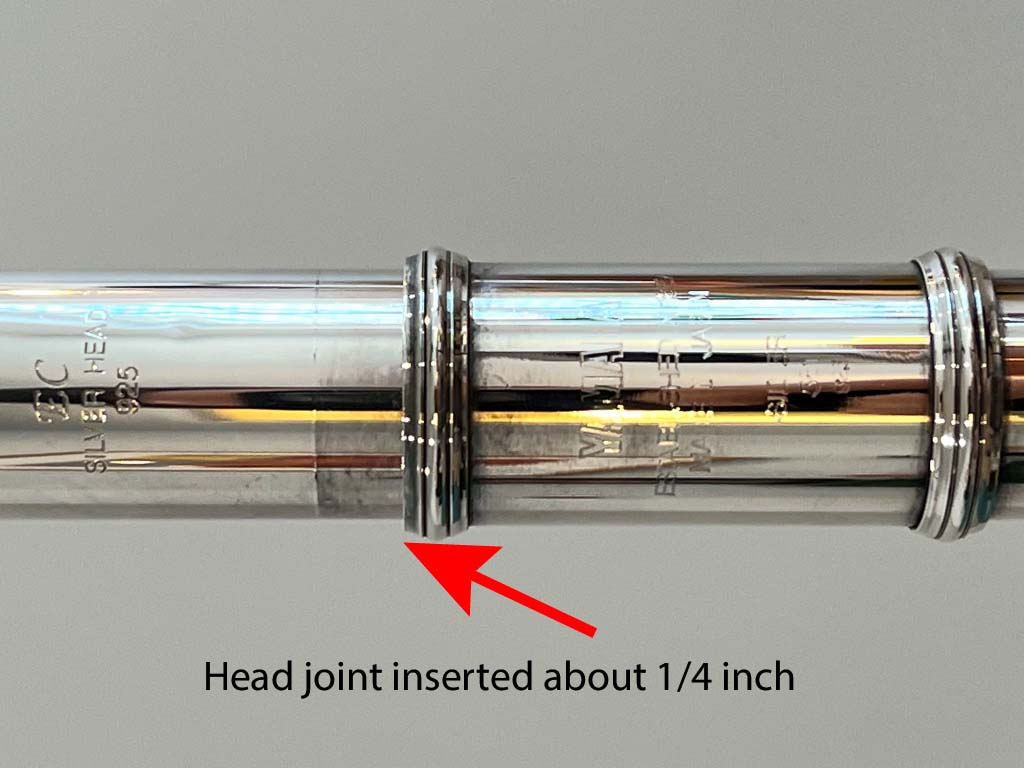
- The head joint should be about a ½ to ¼ inch from being inserted into the body all the way.
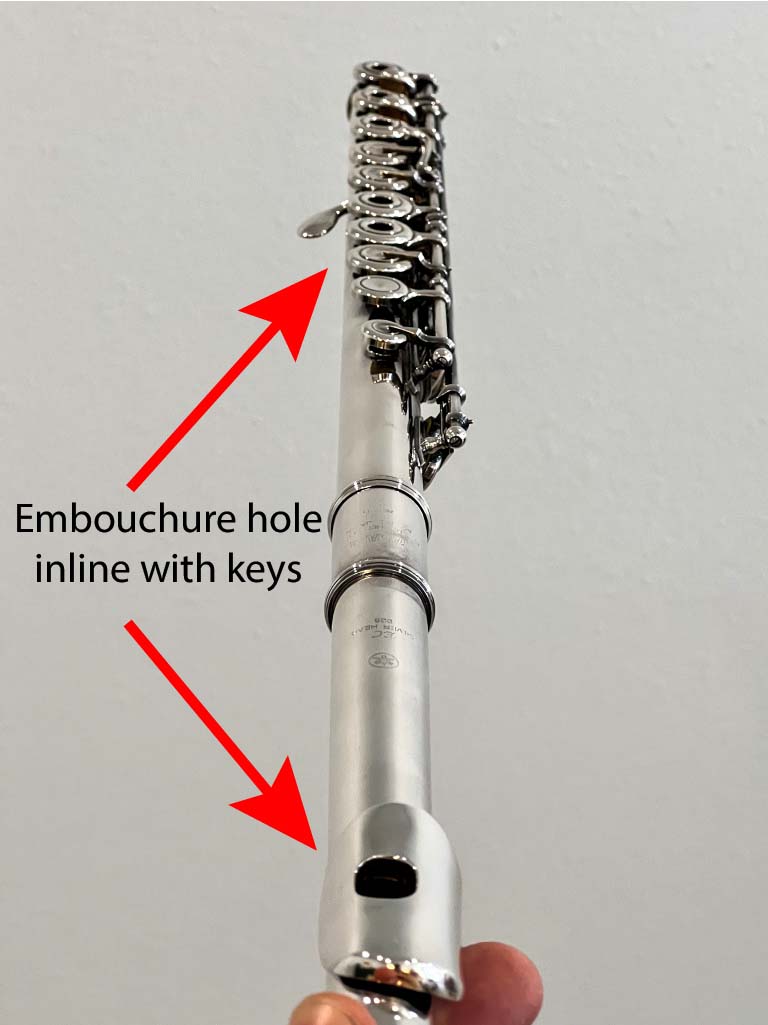
- To check alignment, look down the flute and adjust it so the embouchure hole is in line with the keys. Some beginner flutes even have two arrows pointing at each other, one on the head joint, the other on the body. Simply line the two arrows up.
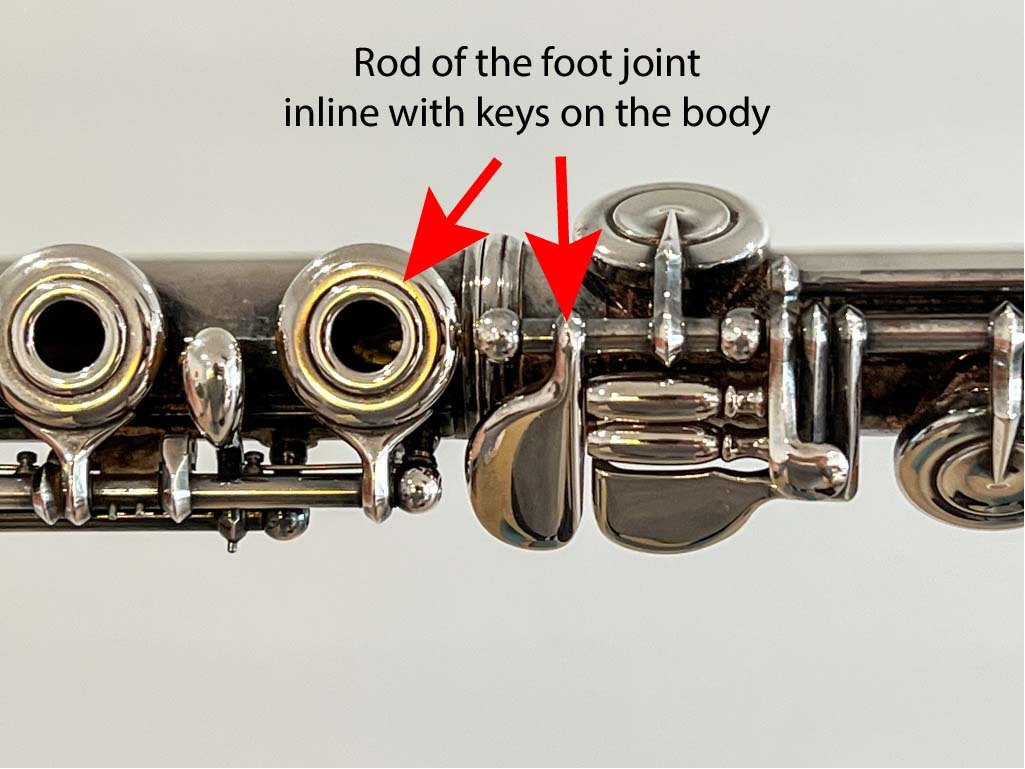
- Connect the foot joint to the body. Hold the foot joint in the palm of one hand with the fingers gently wrapped around. With the other hand, hold the middle of the body in the same way.
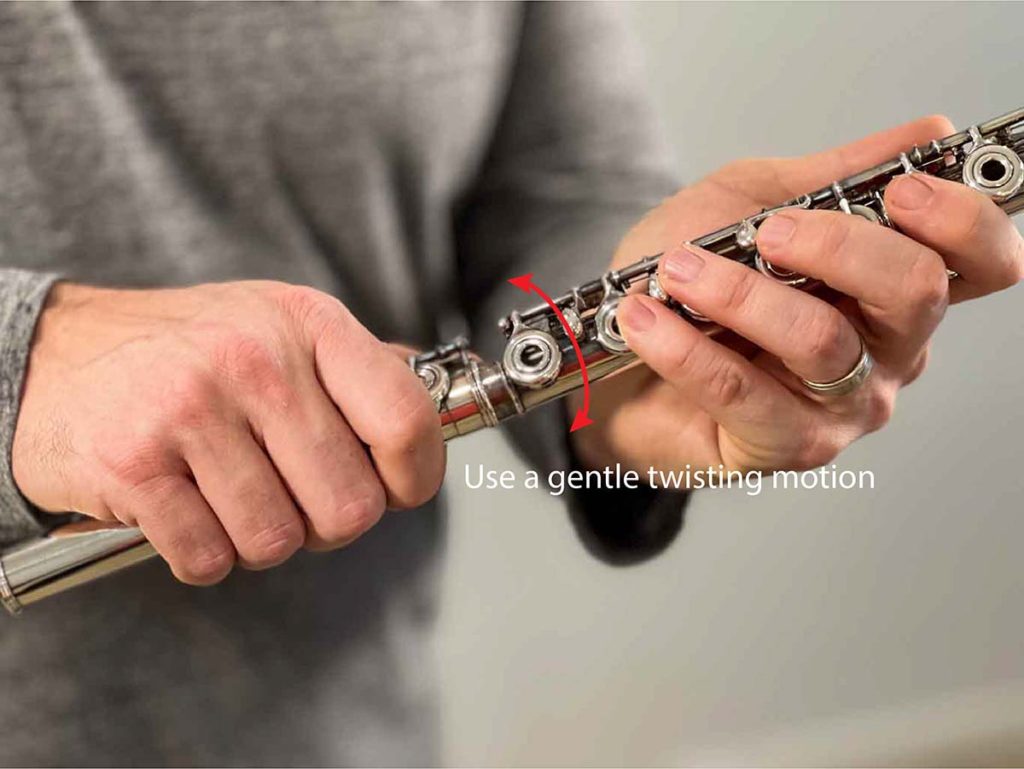
- It is okay for your hands to wrap around the rods as long as you are not holding them too tightly. Using the same twisting motion as before, connect the foot joint with the body. Unlike the head joint, this will go in all the way.
- To set the alignment, look down the flute again. The end of the rod of the foot joint will point to the middle of the keys on the body.
If you find that the head joint or foot joint are a bit tight to get on, don’t grip it and force it together. The piece might be slightly dinged up and need a repair, or there might be some grime on the tenons that are making it tight.
Before you go and grab some WD-40 to try to fix this, stop. You don’t want to put any sort of lubricants to get this to fit. Start by using a tarnish cloth to wipe away any grime. If that doesn’t work, put a little rubbing alcohol on a paper towel and wipe down the areas of contact.
If that still doesn’t fix it, contact the music store and have them either fix it or give you another flute. Trying to fix it yourself could cause more harm than good.
To take a flute apart, simply follow the same steps in reverse. Remember to always use a twisting motion. NEVER just pull the pieces apart or push them together.
The tenons of the flute have the slightest taper and repeated pulling will, over time, slightly stretch the metal. This will eventually cause the joint to loosen.
If any of the pieces are too tight (and possibly stuck – the foot joint is the most likely culprit), place your thumb on the Eb key of the foot joint, and try to twist. Don’t try to muscle it out if it doesn’t come apart, and never go and get your tools. Yes, you can technically get it apart with some pliers, but you will forever ruin that instrument. Just take it to the music store and get their repair person to take it apart.
To prevent tight joints, make sure your child is wiping down the joints every time they finish playing. It doesn’t take much grime to make the joint too tight.
Related: What is a Metronome and Which One is Best? (Pros and Cons)
Basic Flute Terminology
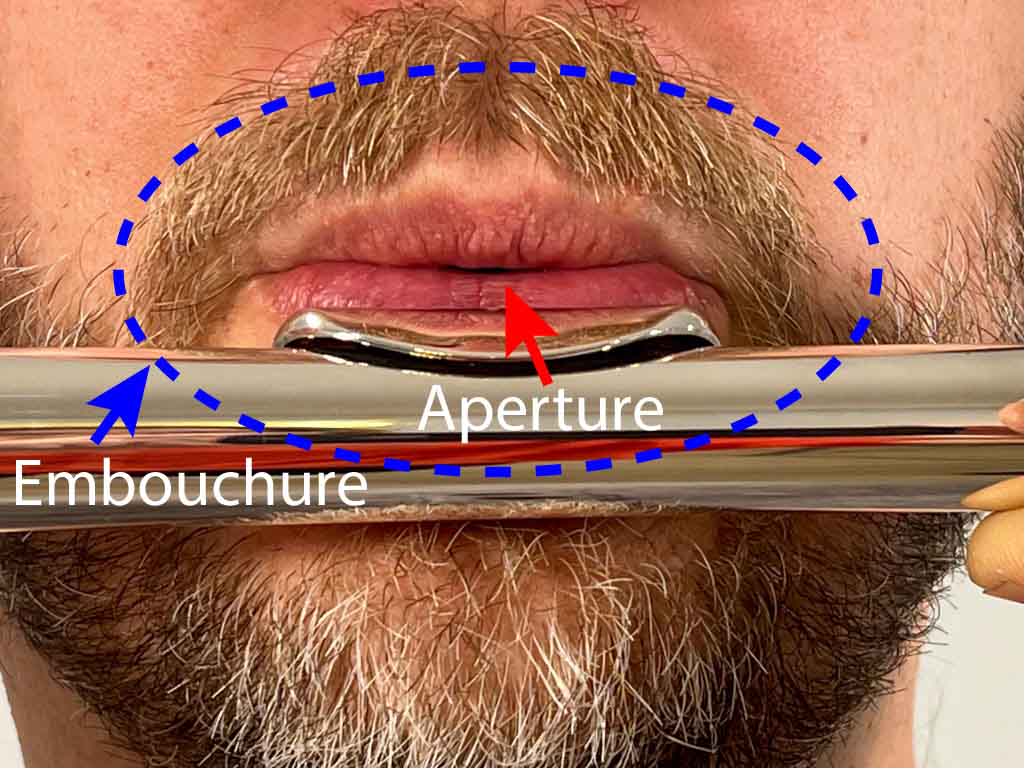
Embouchure – The lips and surrounding muscles that create the shape necessary for playing the instrument. Flutists shape their embouchure by first saying “em” and then “pooh.” They don’t actually say the word “pooh” but blow a stream of air through their lips while creating that shape.
Aperture – The small oval-shaped mouth opening that happens when the flutist blows through their lips. The aperture directs the air across the embouchure hole of the head joint to create sound.
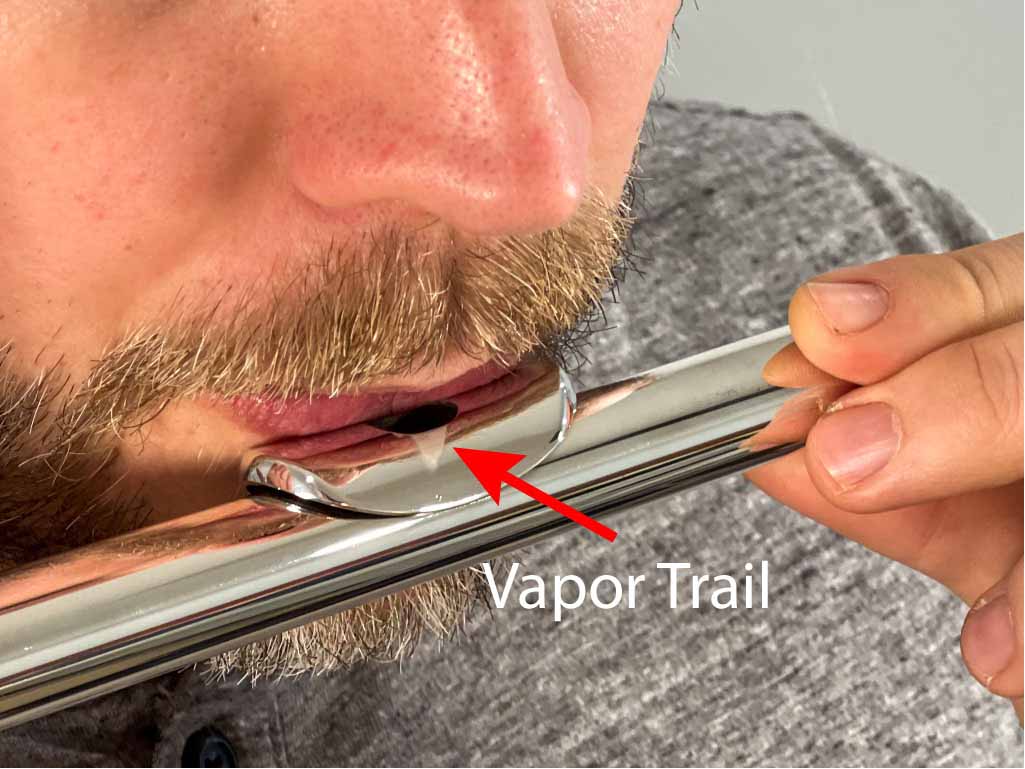
Vapor trail – The visible moisture from the air the flutist blows as it briefly condenses on the metal of the lip plate.
Open hole flute – A flute that has holes in the keys, typical for intermediate or advanced-level flutes. The flutist must cover the holes completely with the pads of their fingers in order to play notes. Not covering them completely will prevent the note from sounding correctly.
Closed hole flute – A flute with full metal keys (no holes in the middle), typical for beginner flutes. Since beginners are still learning the basics of hand position, having to also cover holes can unnecessarily complicate the beginner stages. Taking away this variable helps a beginner have success more quickly.
If your child has an open hole flute, it’s common to have plugs for the key holes. They’re usually made of cork or some sort of synthetic material. Personally, I like the synthetic ones as they tend to not pop out as often.
Offset G – When the position of the G key (played by the ring finger of the left hand) is moved to one side, common with beginner flutes. This makes the key easier to reach, especially for little hands.
Inline G – When the position of the G key is in a straight line with the other keys. As your child advances to an intermediate stage (and as their hands grow), they will probably change to an inline-G flute.
Related: 9 Reasons Your Child Should Practice with a Metronome
What to Expect When They Begin Learning
Playing on the Head Joint
In the beginning, your child is going to learn how to use their air and how to create a basic sound. Creating a good embouchure is key to success. The goal is for them to create good habits from the start because it is much more difficult to correct them later.
Don’t be surprised if you hear your child just playing on their head joint when they’re just starting out. This is a good thing, albeit slightly annoying. No good teacher will have them just jump into playing the entire flute, so if your child is not playing on just their head joint in the beginning, check that aren’t just being lazy and skipping this step.
Should my child feel lightheaded?
It is common for beginner flute players to feel lightheaded at first. They’re using a lot of air, but unlike other wind instruments, there is little to no resistance. This means they’re going to take in a more oxygen in a short period of time than they’re used to.
If your child is feeling lightheaded, let them take a break. You don’t need them to pass out or fall over. Frequent short breaks in the beginning are fine. After about a minute or two, they should recover and be ready for more practice.
After about a week or so, your child’s body with get accustomed to using so much air and the lightheaded feeling will go away completely.
Expect your child to practice fundamentals, not just tunes
There are so many fundamentals to playing any instrument – such as breathing, holding the instrument, articulation, fingerings, reading music, etc. – and they must be learned separately first.
In the beginning, you should hear your child play a lot of slow, long notes. This helps them to create a good sound and breathing habits. In fact, they should be spending more time developing a good sound than playing notes. As a director, I’m more likely to overlook a wrong note that sounds good than all the right notes that don’t sound good.
You should also hear a lot of scales in the beginning. Yes, boring for you as a parent, but necessary to establish good fundamentals for your child.
They should also be practicing with a metronome. A metronome is a device that creates an audible click at regular intervals. It is measured in beats per minute (BPM). (insert link to metronome article)
Most kids don’t like practicing with a metronome. It forces them to be honest with their tempo. However, it is a much more efficient way to practice, and will help them to have a much greater sense of pulse. It doesn’t matter if they don’t like it. Get over it and get good!
What To Look for When Your Child is Practicing
The good news is, you’re not your child’s teacher. That being said, there are a couple things to look out for in the earliest stages of playing. A good foundation will make things much easier as they advance.
Posture
For starters, your child should be either standing or sitting on the edge of a chair. When playing seated, their bottom should be on the front edge of the chair and feet flat on the floor. When sitting or standing, the back should be straight but not rigid. Your child shouldn’t be sticking out their chest like they’re at boot camp. They should look tall and comfortable.
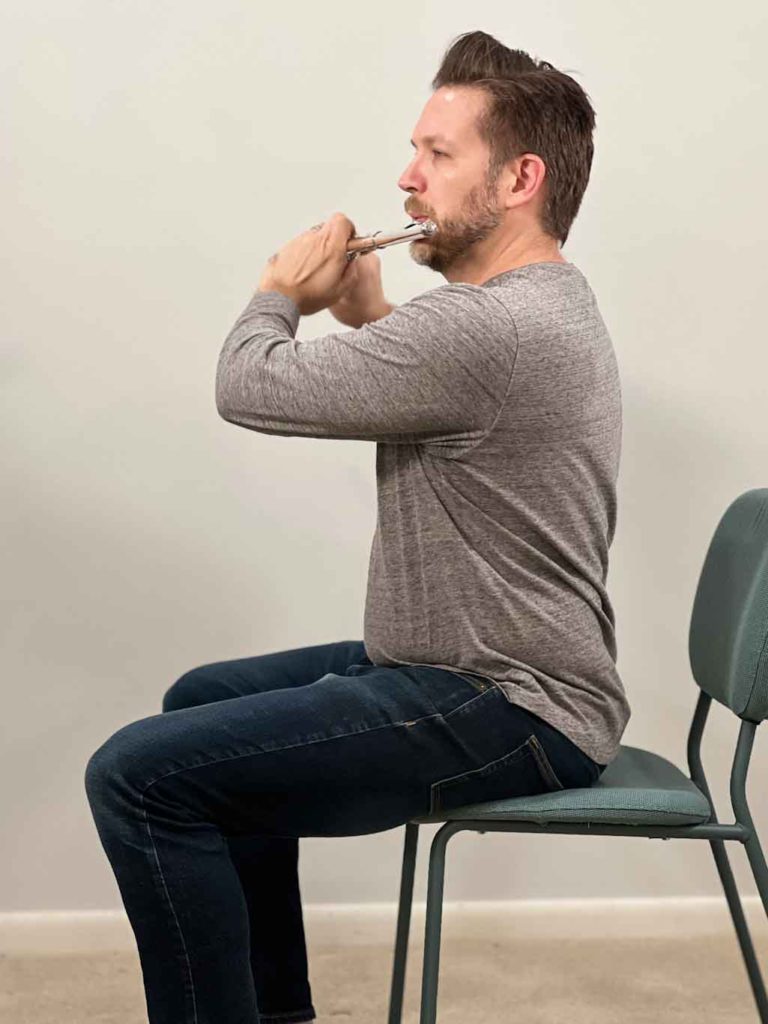
Don’t let your child practice while sitting on the floor, their bed, or with their legs crossed. Music should on a stand, never on the floor (so they don’t have to look down).
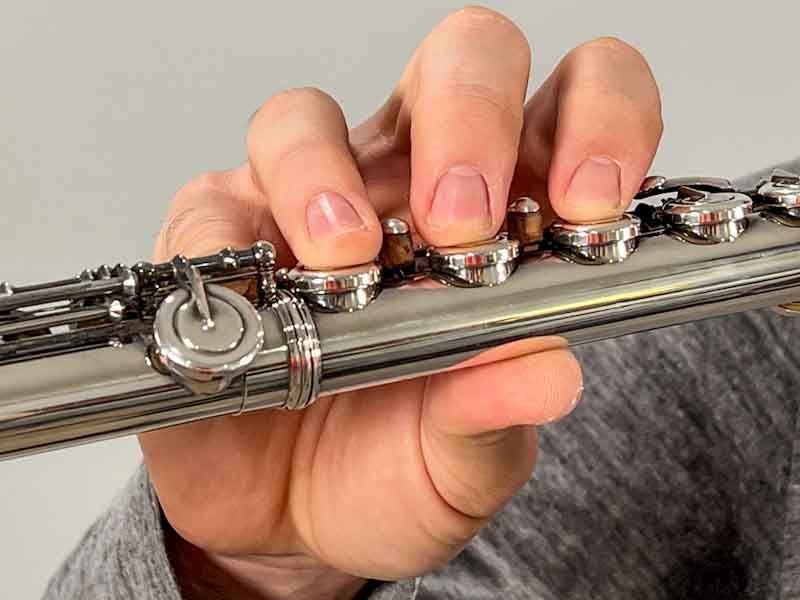
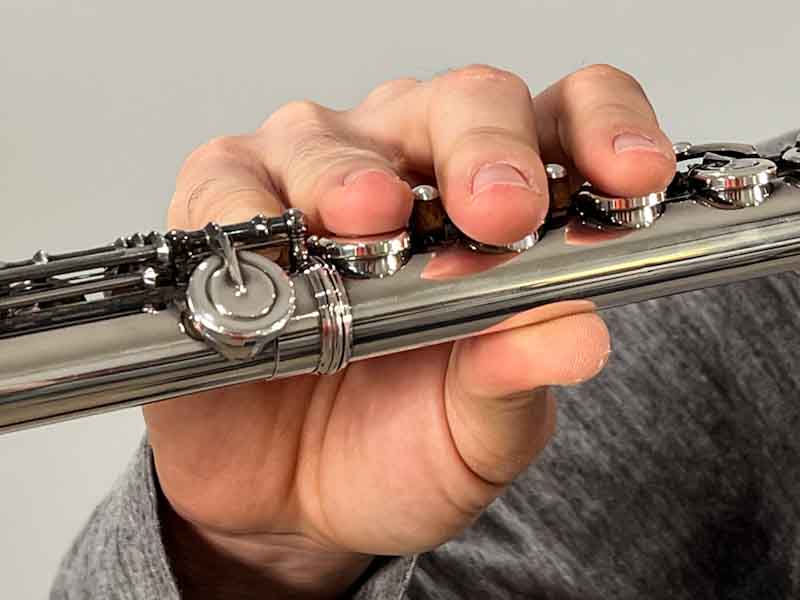
Flute/Hand Position
Generally, the flute should be parallel to the ground or at a slight angle down.
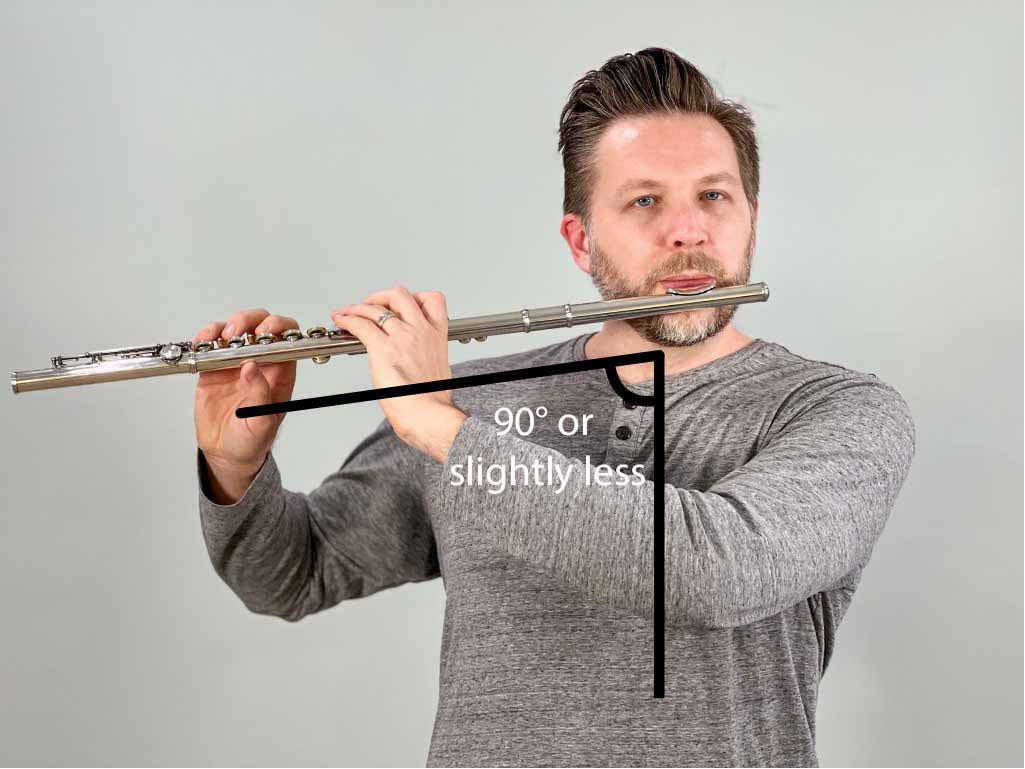
The flute is held in four places: inside the largest knuckle of the left hand, the thumb of the right hand, the pinky of the right hand, and the embouchure. The opposing forces of the embouchure, left, and right hands hold the flute in place.
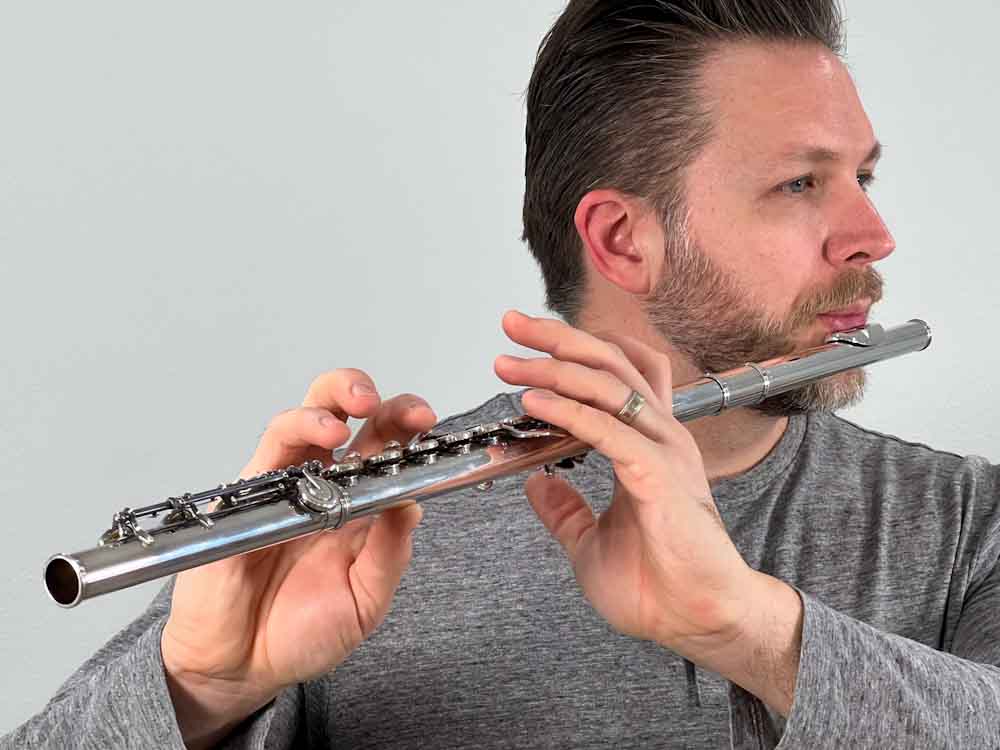
Both thumbs should lie somewhere between the pointer and middle fingers
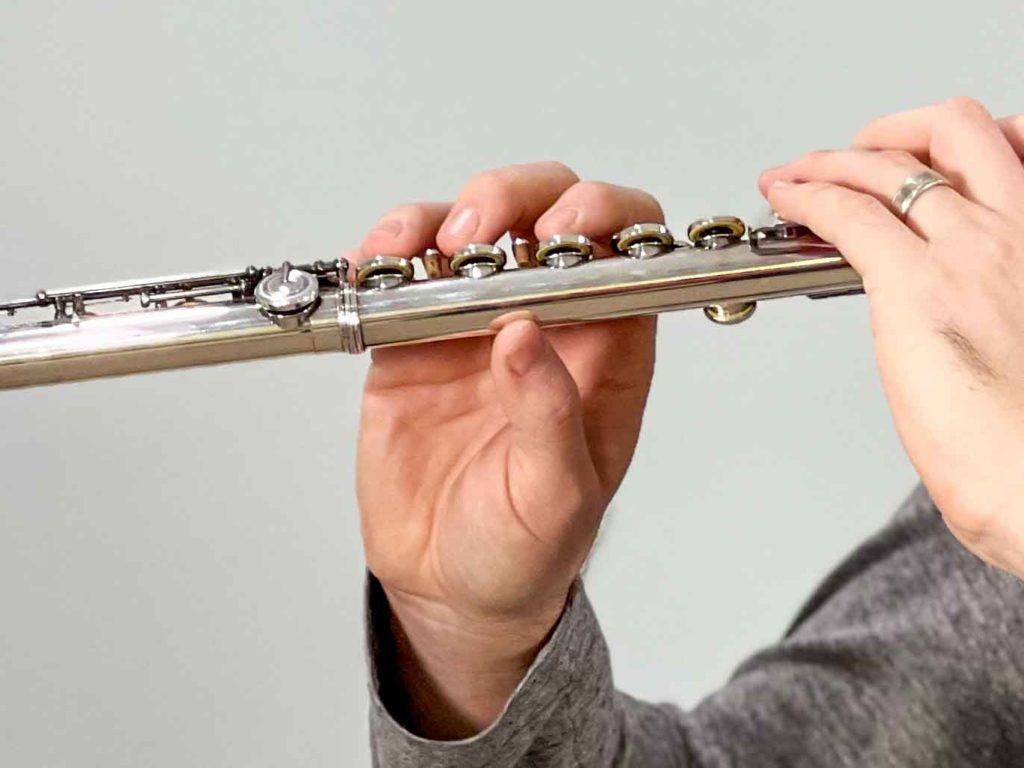
While the right thumb rests on the flute and helps hold the instrument, the left thumb does not. The left thumb should float just off the key. A lot of beginners want to use their left thumb to also hold the instrument. They do this by accidentally pressing the thumb key, or by moving the fingers together and holding the body of the flute.
Also watch for flat fingers. Fingers should be relaxed and slightly curved, never flat.
Embouchure and Aperture
This is really territory for your child’s teacher, so I’m just going to touch on some embouchure basics. A common beginner mistake is making a “smiling embouchure.”
Flutists should have a somewhat pouty face when they play. The corners of their mouth will actually go down a little and shouldn’t go up. The aperture should look more like an oval than a circle.
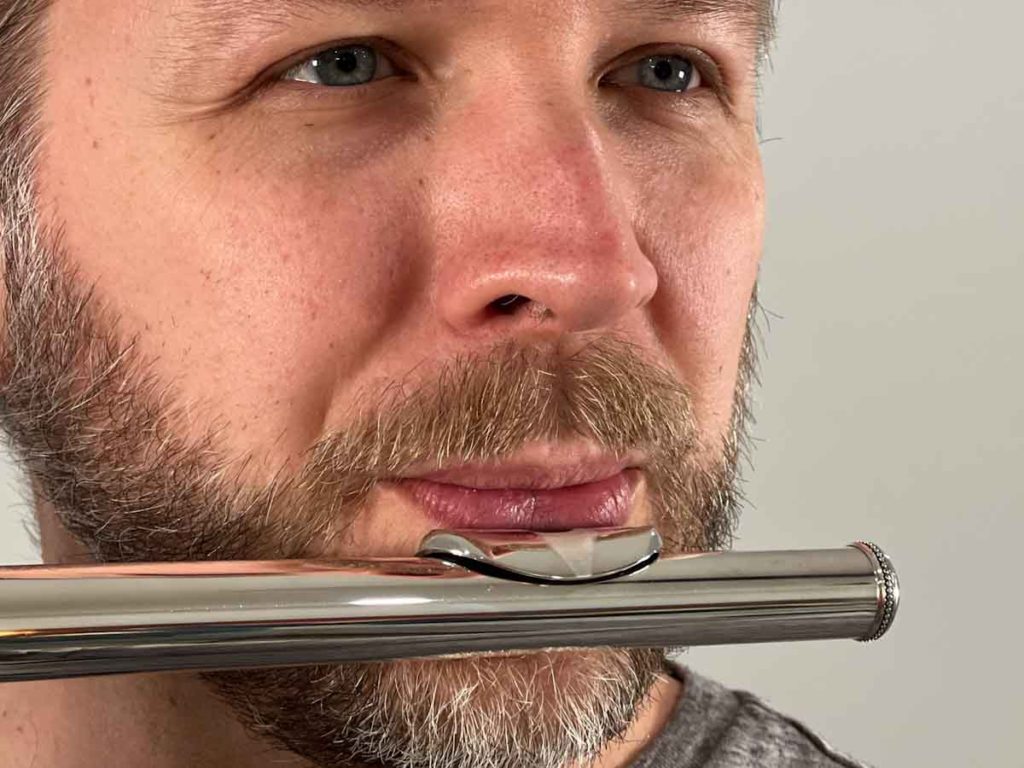
The edge of the embouchure hole should just touch the near the line where the lip meets skin. It should not be any lower. In fact, you should only see the lip above the edge of the embouchure hole.
How long should my child practice?
In the beginning, your child should only need to practice around 15 minutes a day. They don’t have a lot to work on, but they do need to practice frequently. It is better to practice every day for 15 minutes than once a week for 2 hours. They are more likely to create the necessary good habits with frequent repetition.
Remember that playing the flute should be fun and not a chore. You’re teaching your child discipline. Teach it to them gradually over time and let them be done if they get all the work finished in a short time (as long as they’re doing it well!).
Basic Flute Maintenance
There are some simple things your child should be doing every day. Anything beyond this should be handled by an instrument repair specialist. (Whatever you do, never pull out your tools to try to fix the flute yourself.)
- Always play with clean, dry hands. The flute is silver plated and will tarnish very quickly.
- Swab the inside (more on this in a bit) and wipe the outside every time they are done playing. Use two different cloths for cleaning: one for the inside, one for the outside.
- Use a lint free cloth or silver polishing cloth to clean the outside of your flute
- Take the flute apart every time it’s not being used and store the pieces in the case
- Avoid any sort of metal polish
- Do not leave your flute in the car over long periods of time. A hot/cold car can do some serious damage. Keep your flute stored at room temperature.
- Get your flute looked at by a specialist once a year. Over time, pads might move or things might get slightly out of alignment. The pros have special tools to find any issues and can usually fix them quickly.
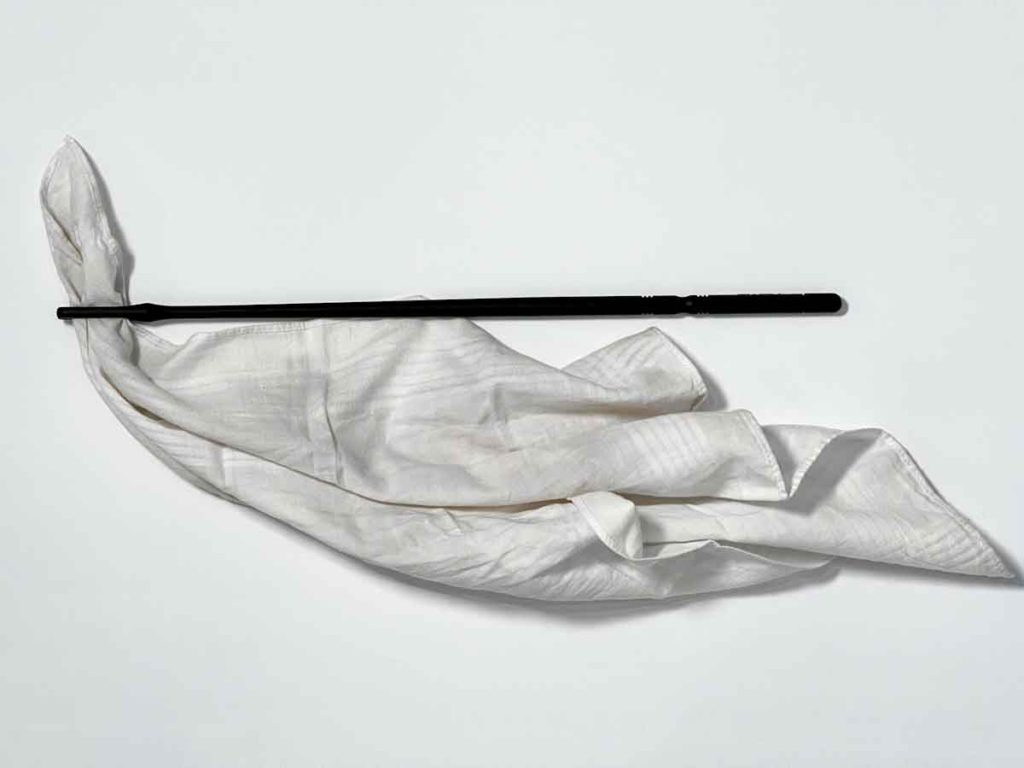
How to Swab Your Flute
First, the cleaning rod should ideally be made of wood or plastic. Some rental companies will include a metal one. It isn’t too bad, but metal-on-metal can cause scratches and dents if not handled correctly. And since a child is doing the handling, I like to take away some variables and just use plastic or wood.
If you don’t have one, you can pick one up on Amazon for under $10, and it should last basically forever.
The second part to the swab is the cloth. This may or may not come with your child’s rental. Luckily, they’re cheap too (in fact, the link above includes a cloth with the rod). You can also use some fabric you already have. A lint-free cloth the size of a small handkerchief made from silk, linen, cotton, or microfiber will work fine. Just make sure it’s not too chunky. You don’t want it to have a tight fit inside your flute.
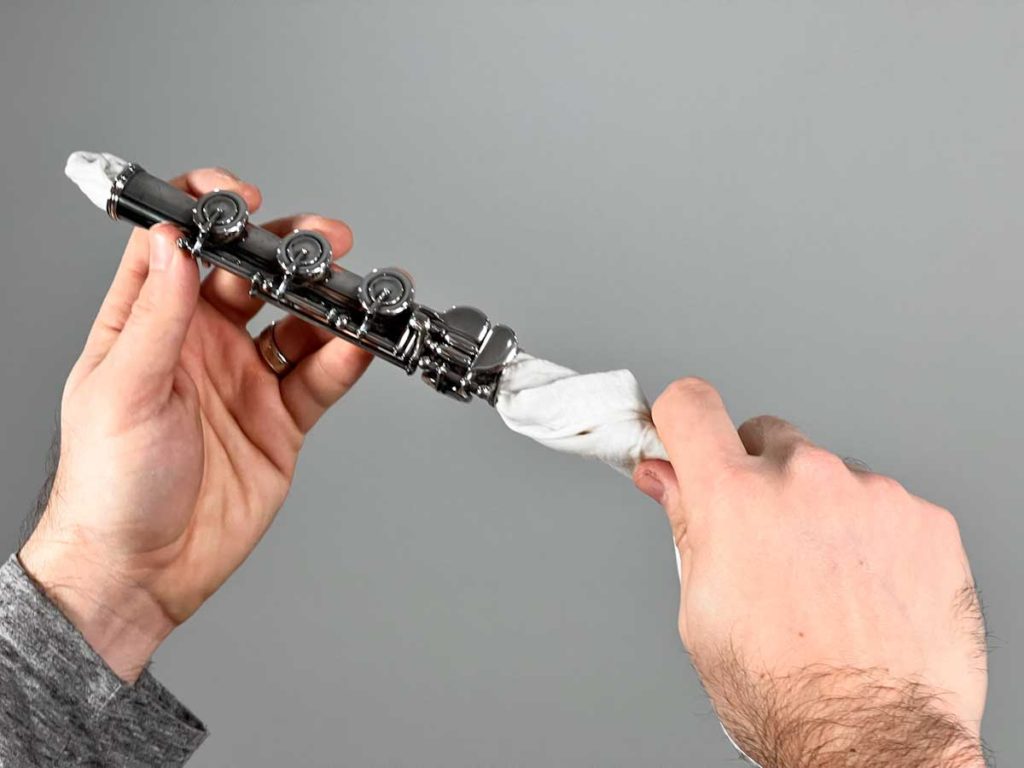
Swab the flute only after it has been disassembled. Place the parts in the case and swab one piece at a time.
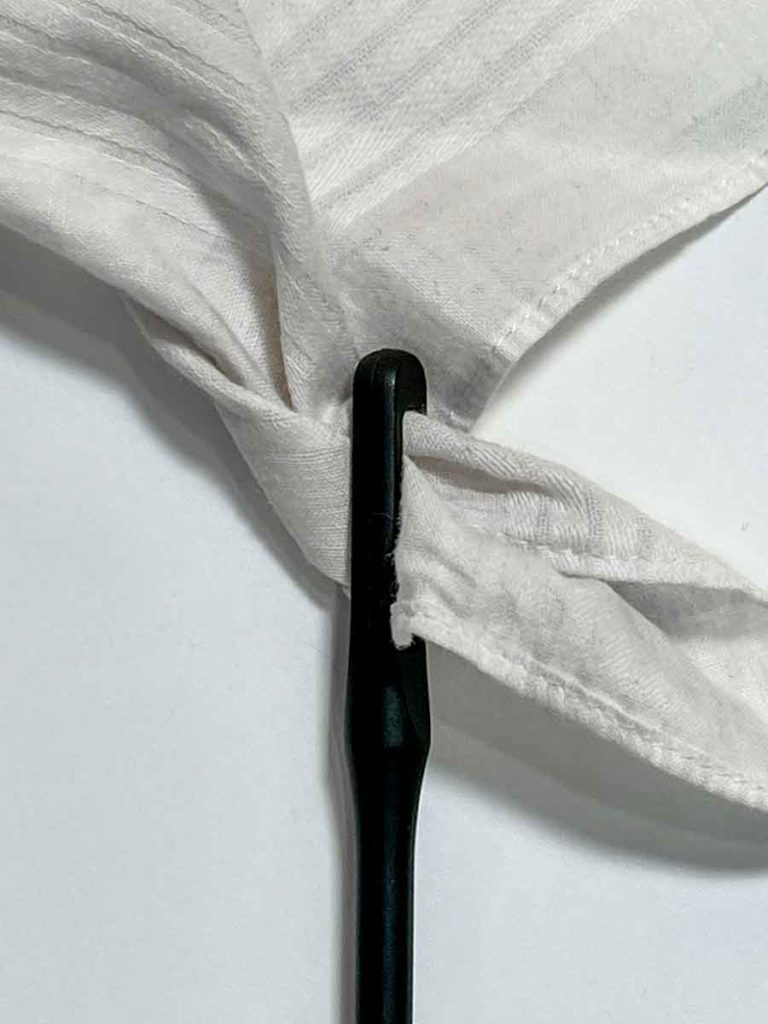
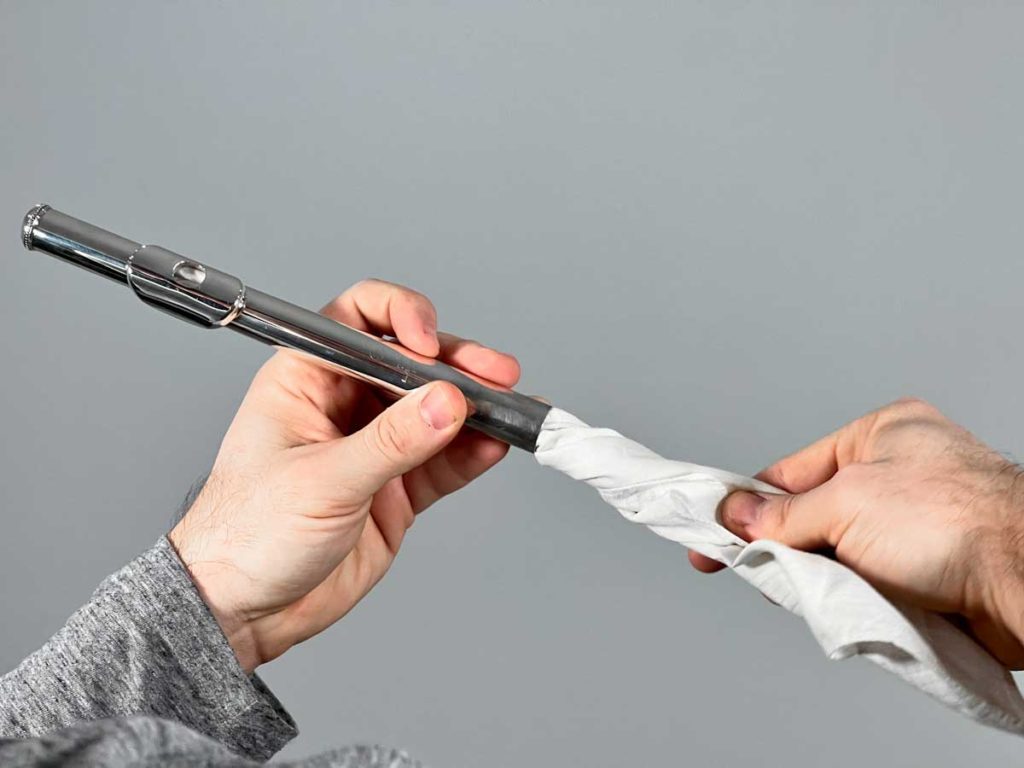
- Insert one corner of the cloth into the hole of the cleaning rod. Pull until an inch or two goes through the hole.
- Flip the long end of the cloth (the end opposite the corner in the rod) over the top of the rod. Let the ends of the cloth wrap around the rod and give it a small twist. At this point, no part of the cleaning rod should be exposed.
- Insert the cloth end into one end of the foot joint. Push until it comes out the other end, and the pull out completely from the other end. If the fit is at all tight, pull back out the way you inserted the swab.
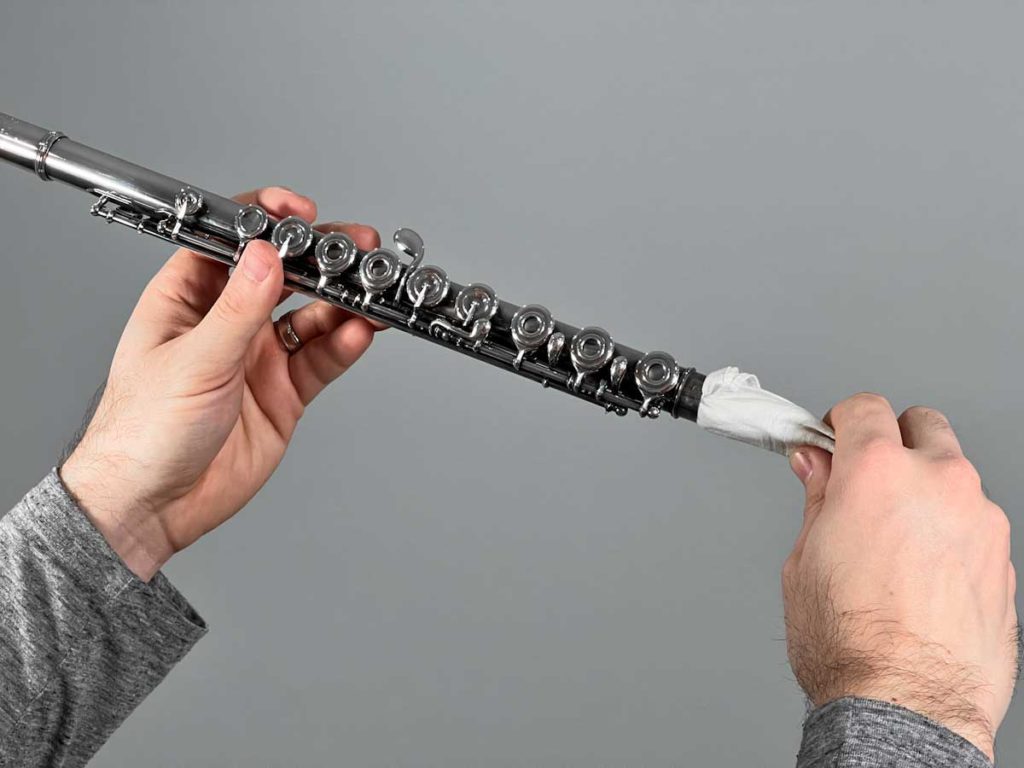
- Repeat step 3 with the body of the flute. If the fit isn’t tight, pull swab out the other side. Otherwise, pull out and swab from the other end of the flute also.
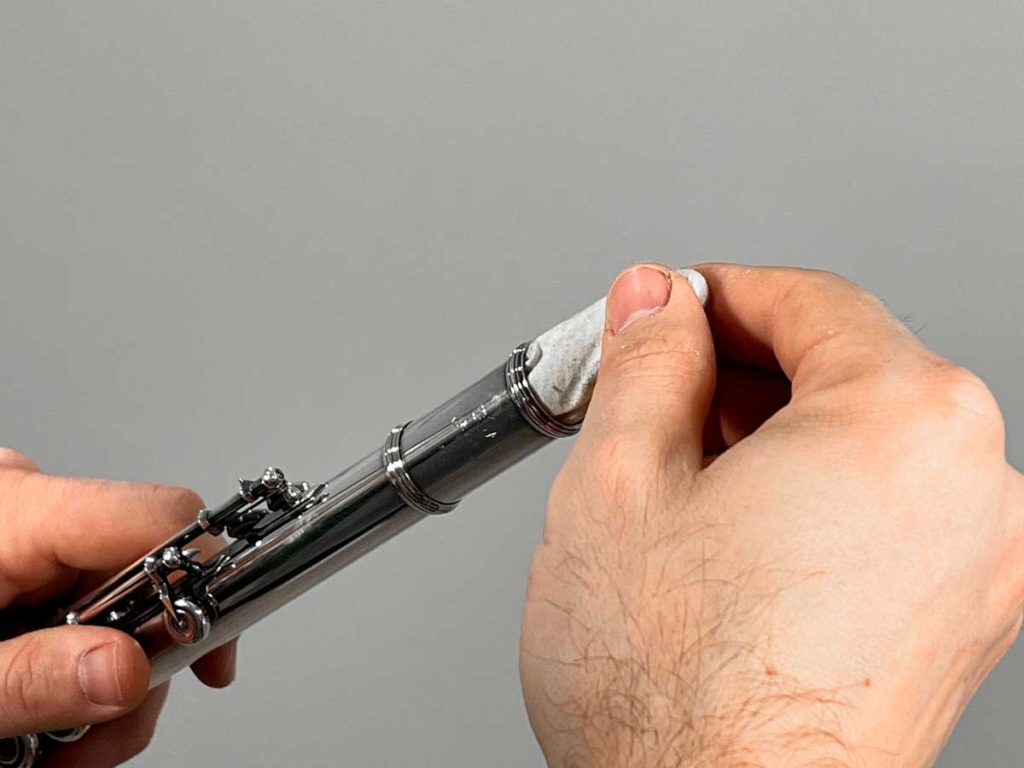
- Insert the cloth end of the swab into the head joint until it stops. Twist the head joint to make one complete turn, and then pull the swab out.
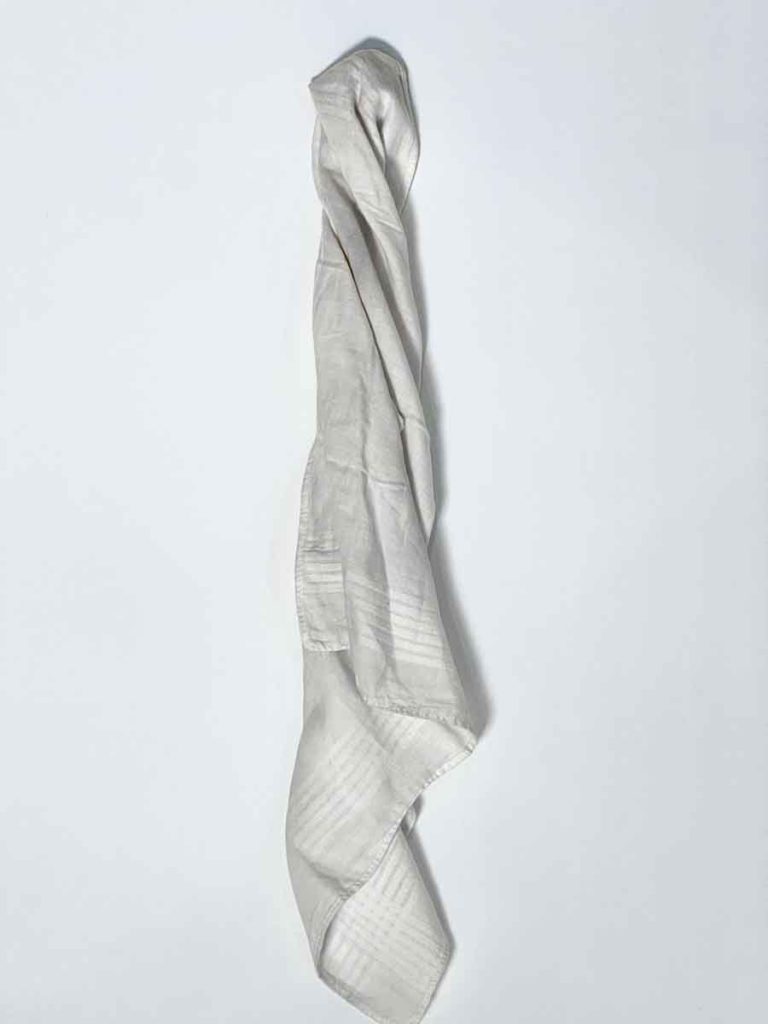
- Take the cloth out of the cleaning rod, fold it nicely, and store it with your flute. Many beginner cases have separate pouches on the outside of the case. Store your cloth in these, NOT in the flute case itself. If the cloth is too thick, it can damage the flute if it’s put inside the flute case, on top of the flute.
Other Equipment
There are going to be a couple things you will need to buy up front, and a couple things that will be nice to have but can wait. Here’s a list of things to expect up front:
- Music stand – yes you need this. It doesn’t need to be fancy. As much as I hate the rickety metal folding stands, they are inexpensive and portable. An even better choice is one that partially collapsible. The legs fold up, but the part that holds the music is solid. And luckily for you, these are getting cheaper (like this one on Amazon).
- Metronome – a metronome is a device that creates an audible click at regular intervals. It is measured in beats per minute (BPM). Your child should be practicing with a metronome. To learn more check out my article here.
- Tuner – Your child will be using one a little in the beginning but will quickly move to one as they progress. A tuner app on a smart phone is great. To learn more about tuners, check out this article.
- Method book – Your child will be working out of a book with their teacher (either the school teacher or private teacher). Don’t buy anything until you find out exactly what your teacher wants.
- Cleaning cloths – We talked about this some in the maintenance section. You will need two cloths: one for the outside of the flute, one for the inside. A lint-free cloth the size of a small handkerchief made from silk, linen, cotton, or microfiber will work fine for the inside.
- For the outside, use either lint-free cloth or silver polishing cloth (like this one) to clean the outside of your flute. I personally use something like this because it has one layer that can clean off any tarnish (the white layer) and the other side for the final polish (the gray side).
- Flute Stand – this is not necessary for a while but can be nice to have. If your child gets more serious and has to do some doubling on piccolo (usually in high school), then they might need to set one instrument down and pick up the other.
- This is also nice to have at home so your child doesn’t need to put their instrument in the case all the time. It’s often easier to start practicing when your instrument is out already.
- There are a lot to choose from but at this level, you don’t need anything fancy. A simple folding one like this is a good beginner option.
Other Common Flute Questions
Why is a flute a woodwind instrument?
The flute is considered a woodwind instrument because, historically, the first flutes were made of wood. Flutes are now made of metal, but they are still classified in the woodwind family of instruments (which also includes clarinets, oboes, bassoons, and saxophones).
Is it pronounced “flutist” or “flautist”?
Both “flutist” and “flautist” are acceptable terms to describe a flute player. Generally, Americans use “flutist” while “flautist” is more common in Great Britain. The origin of “flautist” is likely from the Italian word for flute (flauto), and it began to be used in the mid-1800s.
I know some non-musical people tend to say “flautist” out of a fear of sounding ignorant about the correct term. When in doubt, I suggest using the word “flutist” or “flute player.”
“I am a flute player not a flautist. I don’t have a flaut and I’ve never flauted.”
Flute virtuoso James Galway
Should my child take private lessons?
Students should take private instrument lessons to receive individual instruction from an expert in that instrument. The student will learn more quickly and may avoid issues with playing fundamentals that can cause problems in the future.
So the simple answer is: YES! I’m sure the beginner band director is doing a great job, but (and I know they will all enthusiastically agree with me) nothing compares to having dedicated one-on-one time with a flute specialist. Your child will get better a lot faster in lessons.
If there isn’t a private lesson program at your school, ask your band director to recommend a local teacher. To learn more about private lessons and why your child should take them, check out my article here.
When is the best age to start the flute?
A good time to begin learning the flute is between age 9 and 11. Children could begin sooner, but they may require a flute with a curved head joint to accommodate their shorter arms. Most schools offer beginner flute instruction between the 4th and 6th grade.
Related Posts
It’s a typical weekday morning and you are going through your child’s take-home folder. Along with the monthly lunch menu, you find a flyer about signing up for band or orchestra. That’s when...