
What seems like a couple years ago (but is actually now 20 years ago), I took a photography class in my undergrad, back in a time before DSLRs were ever a thing. On the first day, my professor took the whole class into a room with the window covered up with black plastic, closed the door, and turned off the lights.
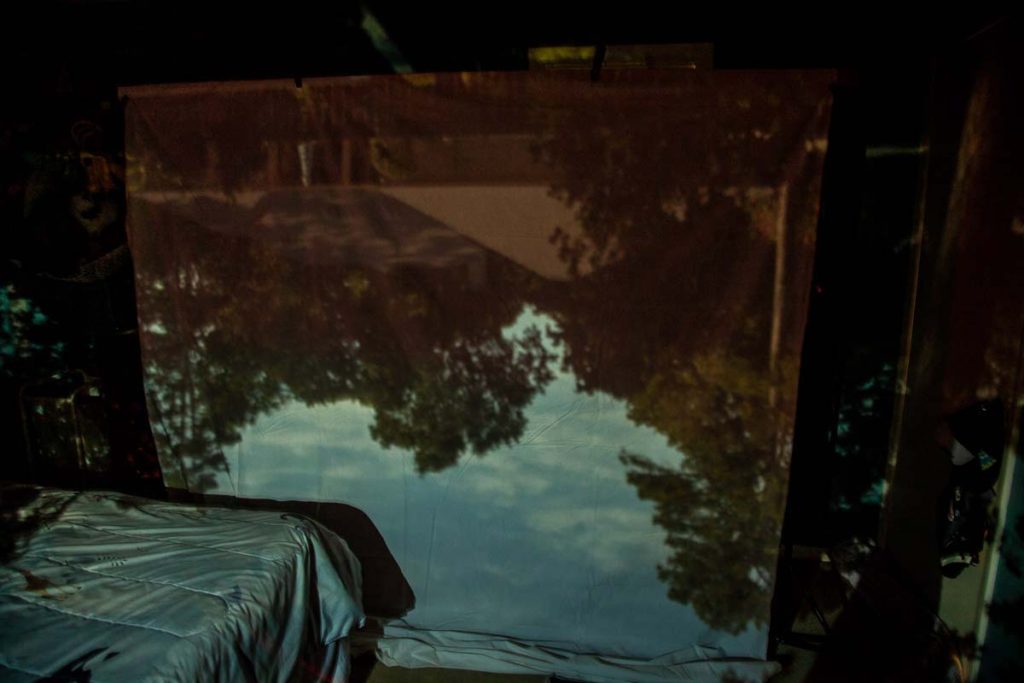
The room was pitch black. He proceeded to open a small hole in the plastic covering the window. Over the next 10 minutes, my eyes gradually adjusted, and I was amazed by what I saw. On the wall opposite the window, I saw a projection of a scene outside, except it was upside-down and backward.
What the professor created is called a camera obscura which is Latin for “dark room.” It is essentially the inside of a very large camera. Now it’s time to blow the minds of my two little boys as I transform their room into the inside of a camera.
Materials
- Black plastic sheeting (you can also cut apart some black contractor trash bags) or cardboard
- Blue painter’s tape (it doesn’t necessarily have to be blue tape, but you’re less likely to accidentally take the paint off the walls)
- Black cardstock
- Large washer
- Duct tape
- Scissors
- X-acto knife (or the Knife of Exact Zero: optional)
- White sheet for the backdrop (if your walls are dark and/or cluttered)
Step 1: Pick a room with a north-facing window
Start by finding a room in your house that has an exterior window. North-facing is best (because objects outside are more likely to be in the sun), but any window should work. Ideally, you want a room without too many windows. The room needs to be completely dark and a lot of windows means a lot of blacking out.
If you can, try to find a room with an interesting view that will be well-lit. A window that looks into a dark wooded area or a really close neighbor isn’t going to show very much. An unobstructed view is best.
I’m going to use my oldest son’s bedroom. It’s north-facing, has a small window, and has a nice open view of our neighbor’s house. It’s also the best option we have in our house.
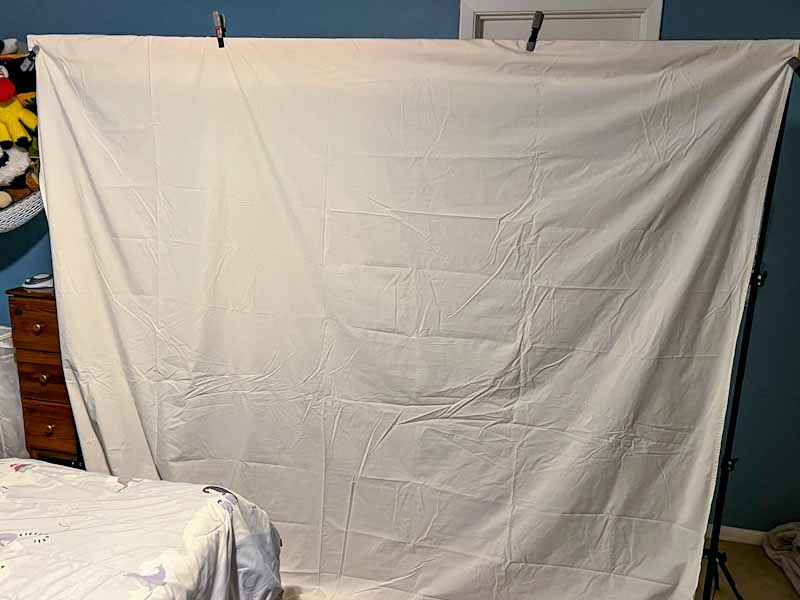
Step 2: Set up a projection wall
If the wall opposite the window is white (or a really light color) and doesn’t have too many hanging things, you should be ready for the next step. If not, either tape or hang a white sheet (this will serve as a sort of projector screen). A white sheet will show you a better image than a dark wall full of pictures.
My kid’s room has medium blue walls with pictures and a dresser in the way, so I had to improvise a little. I took two light stands (super cheap ones that came in a kit) and an 8-foot piece of 1×2 wood I had lying around. I drilled two holes for the top of the light stand and draped the sheet over the wood. A couple of cheap Harbor Freight clamps held the sheet in place.
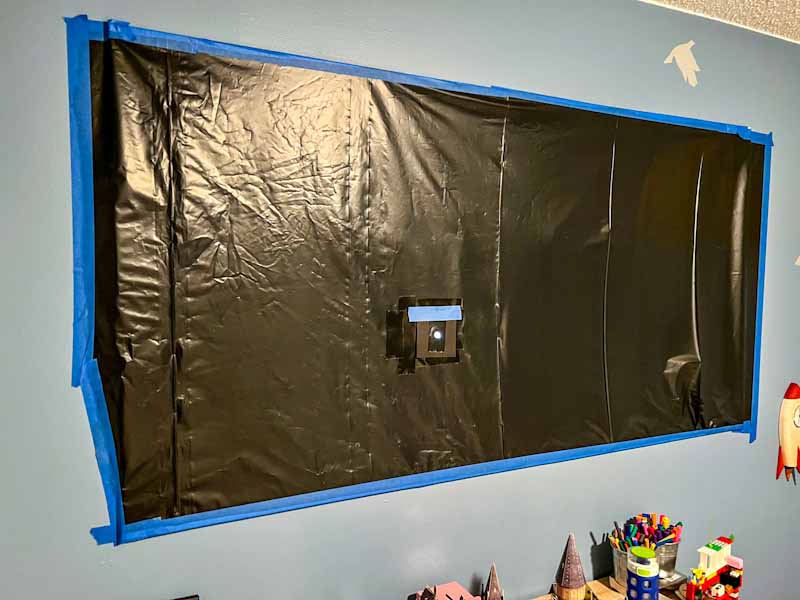
Step 3: Make the window light tight
The next step is to cover the window completely so there aren’t any light leaks. Take the black plastic sheeting and tape it around any windows in the room.
I’ve also seen this done with cardboard. One of the more interesting alternatives I’ve seen is done by misting the entire window with water and pressing aluminum foil (get the cheap thin stuff) against the glass. The method is not important; just make sure the window is completely covered.
Step 4: Cut out the aperture
There are a couple options when cutting the aperture (the hole for the light to come in). If you cut a bigger hole, more light will come in, but the image projected on the wall/sheet will look blurrier. A smaller hole will look sharper, but darker.
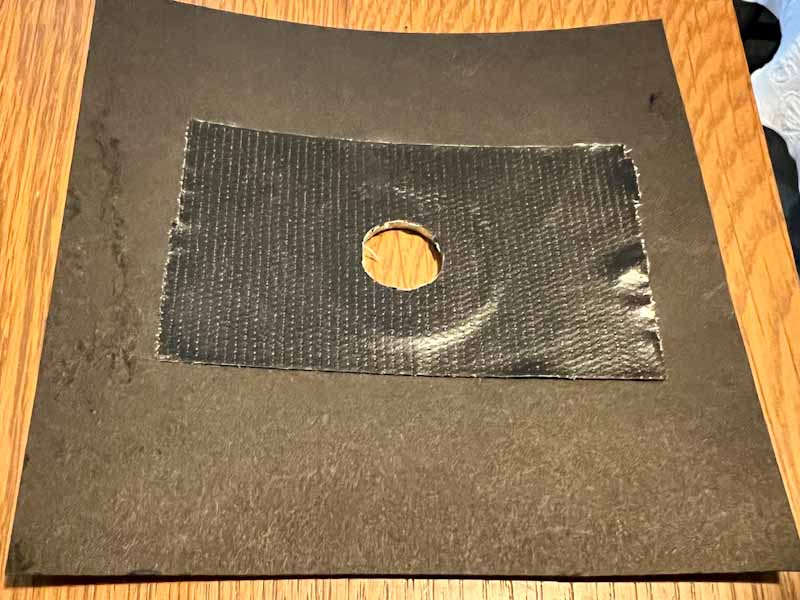
I personally found the image to look much better with a smaller aperture. You can do this by cutting a very small hole in the plastic, but a clean and even circle will give a crisper image (and I’m not about to dive into the subject of differently shaped apertures…). For this project, we’re going to use a washer to give us that nice crisp, precise circle.
Start by cutting a piece of black cardstock into a 5×5-inch square (the measurements aren’t super important so don’t bother with the ruler).
I happened to have a large washer (about an inch in diameter) lying around. Trace the outer part of the washer in the center of the cardstock square and cut out the circle with an X-acto knife.
Put the washer inside the cutout hole and put a piece of duct tape over the washer and cardstock to hold the washer in place.
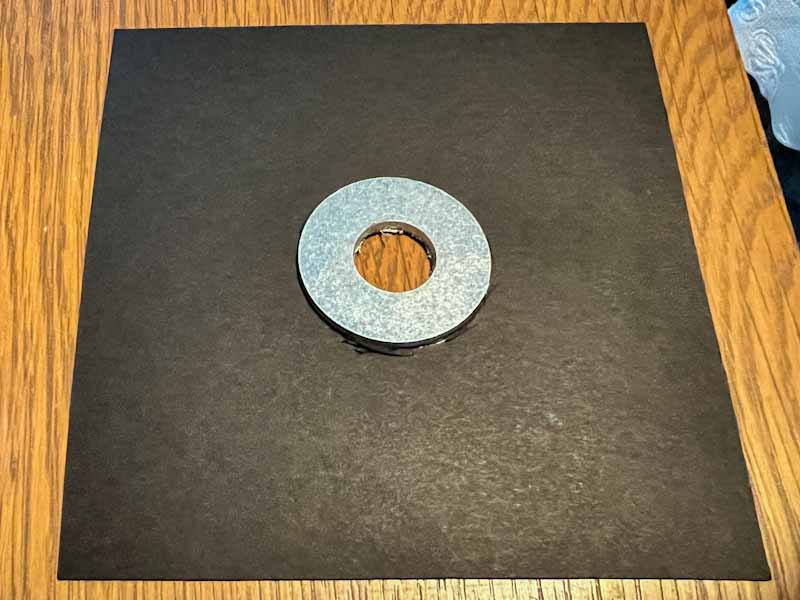
Cut out the tape in the inner part of the washer.
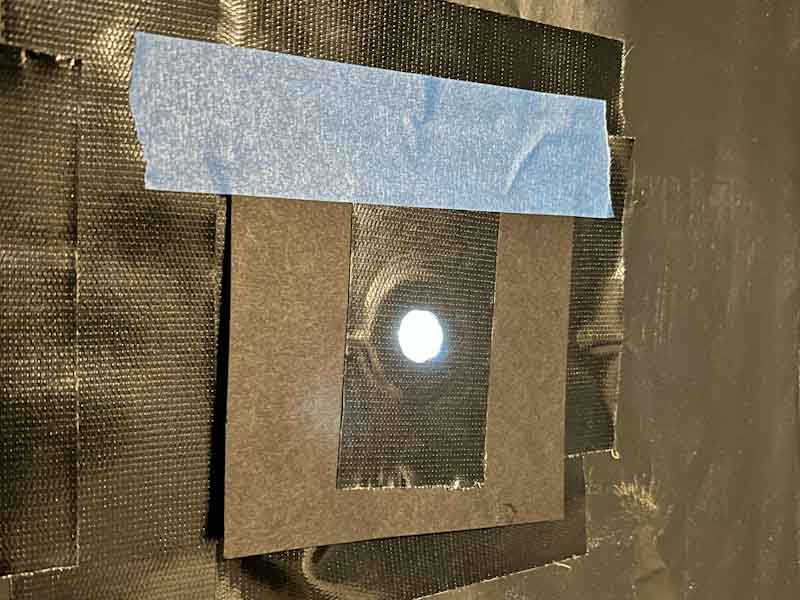
Cut a square the size of the outside of the piece of cardstock in the middle of the black plastic covering the window (avoid any trim or decorative work that might be in the middle of the window. I’m not speaking from experience or anything…).
Use duct tape to tape the cardstock to the square hole you cut out of the plastic. Be sure to tape all four edges so no light leaks in except from the hole in the middle.
Step 5: Make the room light tight and turn out the lights
Take a couple of towels and put them at the foot of the door. This will keep out any light that might leak underneath.
Turn off all the lights and make the room as dark as possible. In a minute or so, your eyes will adjust and you will see an image on your wall/projection screen!
Why is the Image Upside Down and Backwards in a Camera Obscura?
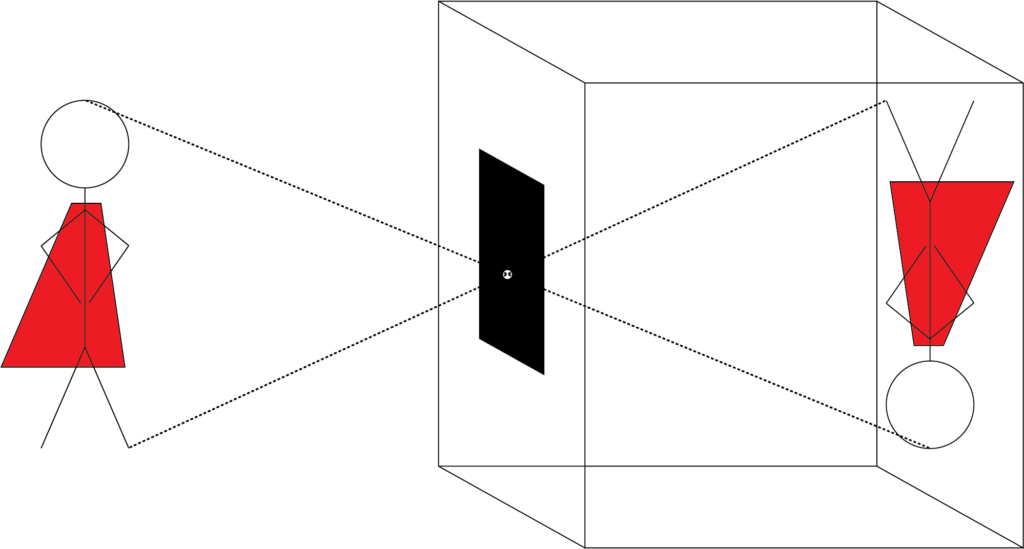
The reason the image projected on the opposite wall is reversed is because of the way light travels through the hole into the room. Light travels in straight lines (the fancy term is called the rectilinear propagation of light. Look it up.). Light rays that reflect off the top of an object outside pass through the hole in a straight line and are projected on the bottom of the wall.
If you look at the Superdad stick figure below (I know, the artwork is brilliant. I can send autographed prints if you contact me at IStinkAtDrawing@yourmom.com), you will see that a straight line drawn from the top of his head to the hole in the blacked-out window continues to the bottom of the wall. The line drawn from his foot to the hole continues to the top of the wall.
The camera obscura is nothing new; it’s actually very old technology and the basis of what eventually became the camera.
The earliest known written account of the camera obscura dates to the Chinese philosopher Mo-Tzu in 400 BC. Aristotle also discovered this principle by watching the shadow of an eclipse under a tree. At the turn of the 15th century, Leonardo da Vinci hypothesized that the eye is like a camera obscura and went on to write about it in his Codex Atlanticus in 1502. Eventually, the Italian scholar Giambattista della Porta (1535-1615) added a concave lens near the hole which made the image much sharper and brighter.
(FYI, if you’re looking for a great book recommendation for your kids, check out Wow In The World: The How And Wow Of The Human Body. When I explained what was happening to my oldest son, he quickly jumped up and explained that what we were seeing in the room also happens in your eye. If my kid is excitedly learning this independently by reading a book, then someone is doing something right.)

Related Posts
Recently my oldest son and his friends have gotten super into dragons. They’ve been reading the Wings of Fire series by Tui T. Sutherland (a great read for your kids by the way), and now...
It’s Saturday afternoon, it’s raining outside, and I desperately need to find something to do with my kids before they drive me nuts. I don’t feel like driving to the store, so it’s...